Elijah Lucas studied Political Science at Georgetown University and has over 12 years of experience covering national and international politics. He has reported on U.S. elections, policy reforms, and geopolitical events for major media outlets. His expertise lies in government analysis, political reporting, and global diplomacy. Elijah has received recognition from the U.S. Press Association for his investigative reporting. In his spare time, he enjoys hiking, classic literature, and mentoring student journalists. At TLG.WTF, he leads political coverage and provides readers with fact-driven political analysis.
Checking your computer's specifications in Windows 10 in April 2025 is a straightforward process that provides valuable information about your system's hardware and software. By following these steps, you can easily access the details you need for various purposes.
Checking your computer's specifications in Windows 11 in April 2025 is a straightforward process that provides valuable information about your system's hardware and software. By following these steps, you can easily access the details you need for various purposes.
Removing malware and viruses from your computer in April 2025 requires a systematic and thorough approach. By following these steps, you can significantly increase your chances of cleaning your system and protecting your valuable data. Remember to stay vigilant and practice safe computing habits to prevent future infections.
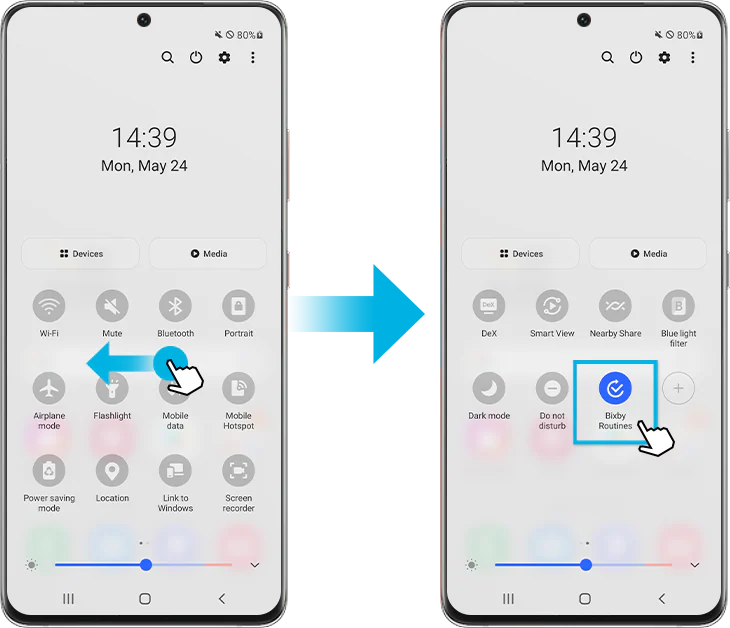
Enabling Developer Options on your Android phone in April 2025 is a straightforward process that involves a few taps in the Settings app. By following these steps, you can unlock a range of advanced settings and tools to further customize your device and explore its hidden capabilities. Remember to use these options responsibly and with caution.