Author: William Johnson

  • How to Customize Samsung Always-On Display with Animation

    How to Customize Samsung Always-On Display with Animation

    The Always-On Display (AOD) is a signature feature of Samsung Galaxy phones with AMOLED screens, allowing users to glance at essential information like time, date, notifications, and battery status without fully waking up their device. But AOD is not just about utility; it’s also a canvas for personalization. Modern Samsung devices, especially those running recent versions of One UI, offer a surprising depth of customization, including the ability to add animations, GIFs, and dynamic visual elements to your AOD, making your phone truly unique.

    The Always-On Display was first introduced by Samsung with the Galaxy S7 in 2016. Its core principle relies on the power efficiency of AMOLED technology, where individual pixels can be turned off completely to display true black, meaning only the illuminated pixels consume power. This makes it possible to show information continuously with minimal battery drain, unlike LCD screens which would require the entire backlight to be on. Over the years, Samsung has significantly expanded AOD’s capabilities, moving beyond simple clocks to incorporate complex designs, custom images, and, notably, animations to cater to users’ desire for expressive phone interfaces.

    Understanding Animated AOD Options

    Samsung offers several ways to integrate animation into your Always-On Display. These primarily fall into a few categories:

    • Pre-loaded Animated AODs: Samsung provides a selection of built-in animated clock styles and designs.
    • GIFs from Gallery: You can choose a short GIF from your phone’s gallery to display on the AOD.
    • Animated AOD Themes: The Galaxy Themes store offers various animated AOD themes, some free and some paid.
    • Good Lock Modules (ClockFace/LockStar): For advanced customization, Samsung’s Good Lock app, particularly its ClockFace or LockStar modules, provides unparalleled control over AOD animations and elements.

    It’s important to note that animated AODs, while visually appealing, will consume slightly more battery than static ones because more pixels are actively changing or illuminated.

    How to Customize Your Samsung AOD with Animations (Standard Methods)

    These methods use the built-in settings found on most compatible Samsung Galaxy phones.

    Method 1: Using Pre-loaded Animated AOD Styles

    1. Go to Settings:
      • Swipe down from the top of your screen to open the Quick Settings panel, then tap the gear icon (Settings).
      • Alternatively, find and tap the Settings app icon in your app drawer.
    2. Navigate to Lock screen and AOD:
      • Scroll down and tap on “Lock screen and AOD” (or just “Lock screen” on some older versions).
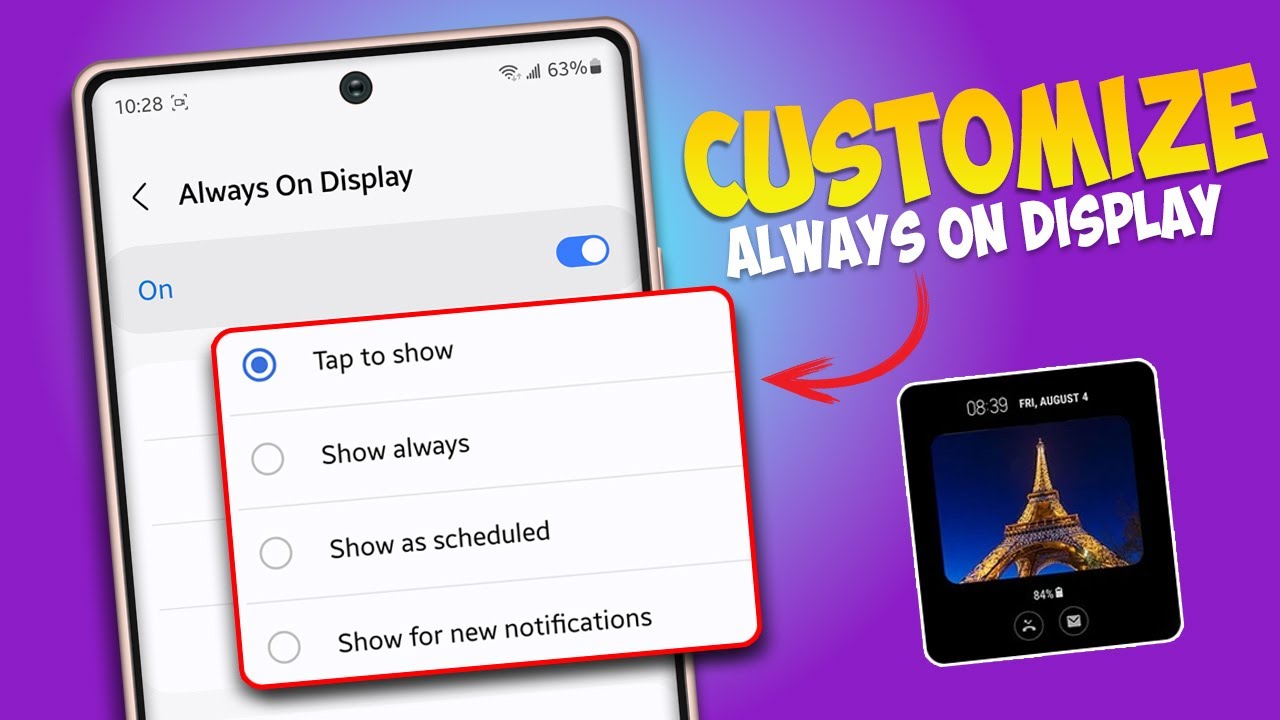
    3. Enable Always On Display:
      • Ensure the “Always On Display” toggle is ON. Tap on the “Always On Display” text itself (not just the toggle) to enter its detailed settings.
      • Entity Definition: AMOLED (Active Matrix Organic Light Emitting Diode) is a type of display technology used in many modern smartphones, including Samsung Galaxy devices. Unlike LCDs, AMOLED pixels generate their own light, allowing for true blacks and vibrant colors, and enabling features like Always-On Display as individual pixels can be turned off.
    4. Select Clock Style:
      • Tap on “Clock style.”
    5. Browse Animated Options:
      • Within the “Clock style” menu, you’ll see various clock types (digital, analog, calendar, etc.). Look for tabs or sections that specifically show “Image clock,” “GIF,” or “Animated AODs.”
      • Swipe through the available pre-loaded animated options. These often include abstract patterns, simple character animations, or dynamic gradients.
    6. Apply Your Choice:
      • Select the animated style you prefer and tap “Done” or “Apply.”

    Method 2: Adding a GIF from Your Gallery

    This is a popular way to personalize your AOD with custom animations.

    1. Follow Steps 1-4 from Method 1 (Settings > Lock screen and AOD > Always On Display > Clock style).
    2. Tap on the “Image” or “GIF” Tab/Icon:
      • In the “Clock style” menu, you’ll typically see an icon that looks like a landscape photo or a GIF icon. Tap this.
    3. Select a GIF from Gallery:
      • Tap the “+” icon (Add GIF) or choose “Gallery” to browse your phone’s stored GIFs.
      • Important Note: For optimal performance and battery life, AOD GIFs are usually limited in length (e.g., typically 5-6 seconds or less). If your GIF is longer, the phone might only play a portion of it once or loop it twice depending on the length. The system will likely warn you about this.
    4. Adjust and Apply:
      • You might be able to crop the GIF or select a specific segment.
      • Tap “Done” or “Apply.” Your chosen GIF will now play on your AOD when the screen is off.

    Method 3: Downloading Animated AOD Themes from Galaxy Themes

    Samsung’s Galaxy Themes store is a rich source of customization, including animated AODs.

    1. Open Galaxy Themes:
      • Long-press on an empty spot on your home screen.
      • Tap “Themes” from the bottom menu.
      • Alternatively, find the “Galaxy Themes” app in your app drawer.
    2. Navigate to AODs:
      • Within the Galaxy Themes app, look for a tab or section specifically for “AODs” or “Always On Displays.”
    3. Browse and Download:
      • Browse through the available animated AOD themes. Many will have a small “play” icon or a preview to indicate animation.
      • Select a theme you like. Check if it’s free or paid.
      • Tap “Download.”
    4. Apply the Theme:
      • Once downloaded, tap “Apply.”
      • You might be asked if you want to apply the “Clock and image” or “Image only” style. Choose your preference and tap “Done.”
      • To manage downloaded AODs later, go to Galaxy Themes > Menu (three lines) > My stuff > AODs.

    Advanced Customization with Samsung Good Lock (ClockFace / LockStar)

    For the most extensive control over AOD animations and design, Good Lock is indispensable.

    • Entity Definition: Good Lock is a suite of powerful customization modules developed by Samsung for its Galaxy devices. Available on the Galaxy Store, it allows users to deeply personalize various aspects of One UI, including the lock screen, quick panel, recent apps, and the Always-On Display.
    • Entity Definition: One UI is Samsung’s customized Android user interface that runs on its Galaxy smartphones and tablets. It’s designed for easier one-handed use and offers a clean, intuitive design with extensive customization options.
    1. Download Good Lock:
      • Open the Galaxy Store.
      • Search for “Good Lock” and install it.
    2. Install ClockFace (or LockStar):
      • Open the Good Lock app.
      • Within Good Lock, find and tap on the “ClockFace” module (or “LockStar” on some versions/updates, as AOD customization is sometimes integrated there). Download and install it.
    3. Open ClockFace/LockStar:
      • Once installed, tap on ClockFace (or LockStar) from within the Good Lock app to open it.
    4. Create or Select an AOD Style:
      • ClockFace: You’ll see various pre-made clock styles, or you can tap the “+” icon to create your own custom AOD. Here, you’ll find options to:
        • Add animated stickers.
        • Integrate your own GIFs more seamlessly.
        • Customize the clock’s font, size, and color.
        • Add various visual elements.
      • LockStar: If AOD customization is under LockStar, you’ll be able to edit both your lock screen and AOD layout, adding and repositioning clocks, widgets, and images/animations.
    5. Add Animations/GIFs:
      • Within the ClockFace editor (or LockStar’s AOD editing interface), look for options to add “stickers,” “images,” or “GIFs.”
      • You can often layer multiple elements, including animated ones, to create a truly unique AOD.
    6. Apply Your Custom AOD:
      • After designing your AOD, tap “Apply” or “Save” to set it as your Always-On Display.

    Important Considerations

    • Battery Consumption: Animations and complex AOD designs consume more battery than simple, static clocks. If battery life is a critical concern, choose simpler AODs or set it to “Tap to show” or “Show for new notifications.”
    • Screen Burn-in: While AMOLED screens are susceptible to screen burn-in, Samsung intelligently mitigates this risk on AOD by subtly shifting the displayed elements around the screen over time. Animated elements are also designed with this in mind.
    • Device Compatibility: Always-On Display and its advanced customization options are generally available on Samsung Galaxy phones with AMOLED screens, typically starting from the Galaxy S7 and newer flagship and mid-range devices. Older models or those with LCD screens will not support AOD.
    • One UI Version: The exact steps and available options might vary slightly depending on your phone’s One UI version. Samsung frequently updates and refines these features.

    By leveraging the built-in settings and powerful tools like Good Lock, you can transform your Samsung Galaxy’s Always-On Display from a mere utility into a dynamic and personalized extension of your phone’s unique style, complete with engaging animations.

    Frequently Asked Questions (FAQ)

    Q1: What is Samsung Always-On Display (AOD)?

    A1: Always-On Display (AOD) is a feature on Samsung Galaxy phones (and other phones with AMOLED screens) that allows a portion of the screen to remain active, displaying essential information like the time, date, battery level, and notifications, even when the rest of the screen is off. It provides quick access to information without needing to fully wake up your phone.

    Q2: Do animated AODs drain more battery than static ones?

    A2: Yes, animated AODs generally consume slightly more battery than static ones. This is because animations require more pixels to be actively changing and illuminated, leading to increased power consumption compared to a static clock or image where fewer pixels are consistently active.

    Q3: Can I use any GIF from my gallery as an AOD animation?

    A3: You can use GIFs from your gallery, but there are often limitations. Samsung’s AOD is optimized for short GIFs (typically under 5-6 seconds). Longer GIFs may only play a portion of the animation once or loop a couple of times before becoming static to conserve battery and prevent excessive processing.

    Q4: What is Samsung Good Lock and how does it help with AOD customization?

    A4: Good Lock is a suite of official Samsung apps available in the Galaxy Store that provides extensive customization options for One UI. For AOD, its ClockFace (or sometimes integrated into LockStar) module allows users to create highly personalized AOD designs, including adding custom animated stickers, GIFs, changing clock styles, fonts, and colors beyond what’s available in the standard settings.

    Q5: Will using AOD cause screen burn-in on my Samsung phone?

    A5: While AMOLED screens are theoretically susceptible to screen burn-in (permanent discoloration from static images), Samsung’s Always-On Display is designed to prevent this. The displayed elements (like the clock and notifications) are constantly and subtly shifted by a few pixels over time, preventing any single pixel from being illuminated for too long and significantly mitigating the risk of burn-in.

    Q6: Why can’t I find the Always-On Display option on my Samsung phone?

    A6: If you can’t find the Always-On Display option, it’s likely due to one of these reasons:

    • Your phone model does not have an AMOLED screen. AOD is primarily supported by devices with AMOLED panels.
    • Your phone’s software is outdated. Ensure your One UI is updated to the latest version.
    • Power saving mode is enabled. AOD is automatically disabled when power saving mode is active to conserve battery. Disable power saving mode to enable AOD.
  • How to Calibrate Your Samsung Phone Touchscreen Manually

    How to Calibrate Your Samsung Phone Touchscreen Manually

    A responsive and accurate touchscreen is fundamental to the smartphone experience. When your Samsung phone’s touchscreen becomes less responsive, registers touches in the wrong place, or misses inputs entirely, it can be incredibly frustrating. This might lead you to believe you need to “calibrate” it in the traditional sense, like older resistive touchscreens required. However, modern Samsung Galaxy phones use capacitive touchscreens, which are highly advanced and self-calibrating in most cases. They detect electrical changes when your finger touches the glass, making direct manual calibration (like drawing specific patterns) unnecessary for general use.

    Instead of a single “calibration” button, optimizing your Samsung touchscreen’s performance involves a series of diagnostic tests, setting adjustments, and troubleshooting steps. These methods help identify underlying issues and fine-tune the touch sensitivity to ensure your phone responds precisely to your interactions. Understanding these processes is crucial for maintaining optimal device functionality and addressing touch-related anomalies.

    Understanding Touchscreen Issues

    Before attempting any “calibration,” it’s helpful to understand what might be causing your touchscreen problems:

    • Software Glitches: Temporary bugs in an app or the Android operating system can cause responsiveness issues.
    • Screen Protector/Case Interference: Thick or poorly installed screen protectors, or ill-fitting cases, can sometimes impede touch sensitivity.
    • Physical Damage: Cracks, drops, or water damage can permanently affect touchscreen functionality.
    • Dirt/Oil on Screen: Grime or oil can create a barrier between your finger and the screen, leading to missed touches.
    • Sensitivity Settings: For some specific scenarios (like using gloves or screen protectors), adjustable sensitivity settings might be needed.
    • Hardware Malfunction: In rare cases, the digitizer (the layer responsible for touch input) itself might be faulty.

    “Calibration” Method 1: Using the Secret Diagnostic Menu (Touch Test)

    Samsung phones have a hidden diagnostic menu that allows you to test various hardware components, including the touchscreen. This isn’t a calibration tool that “fixes” the screen, but it’s an essential first step to diagnose dead spots or unresponsive areas.

    Step 1: Access the Diagnostic Menu

    • Open your phone’s Dialer app (the app you use to make calls).
    • Type the following code: *#0*#
    • The diagnostic menu should appear instantly without pressing the call button.

    Step 2: Perform the Touch Screen Test

    • In the diagnostic menu, look for and tap the “Touch” option.
    • A blank white or black screen with a grid pattern will appear.
    • How to Test: Use your finger to draw across the entire screen, aiming to fill in all the grid squares.
      • If a square lights up green as you draw over it, that area of the touchscreen is responsive.
      • If any squares do not light up, or if your line breaks, it indicates an unresponsive area or “dead spot.”
    • Exit Test: To exit the touch test (and return to the main diagnostic menu), either fill all the squares or press the “Back” button several times.

    What This Tells You: If the touch test reveals unresponsive areas, it strongly suggests a hardware issue (damaged digitizer) that cannot be “calibrated” away. If all areas respond perfectly, the problem is likely software-related or due to external factors.

    “Calibration” Method 2: Adjusting Touch Sensitivity Settings

    Newer Samsung Galaxy phones, especially those with in-display fingerprint sensors or designed to work with screen protectors, often have a dedicated “Touch sensitivity” setting. This can help if your screen feels sluggish after applying a protector.

    Step 1: Navigate to Display Settings

    • Open your phone’s Settings app.
    • Scroll down and tap on “Display.”

    Step 2: Enable Touch Sensitivity

    • Scroll down within the Display settings.
    • Look for an option called “Touch sensitivity” or “Screen sensitivity”.
    • Toggle this option ON.

    What This Does: Enabling this setting typically increases the screen’s responsiveness, making it easier to register touches, especially through screen protectors or if you’re using thin gloves. This is the closest thing to a “manual calibration” setting available on modern Samsung phones.

    Troubleshooting and Optimization Tips (Beyond Direct “Calibration”)

    If the above methods don’t resolve your issue, consider these broader troubleshooting steps that can significantly impact touchscreen performance.

    1. Clean Your Screen and Fingers
    • How-To: Use a microfiber cloth specifically designed for electronics to gently wipe down your screen. Remove any smudges, fingerprints, or debris. Ensure your fingers are clean and dry when using the phone.
    • Why it helps: Oils, dirt, and even moisture on the screen or your fingers can interfere with the capacitive touch recognition.
    1. Remove/Replace Screen Protector
    • How-To: If you’re using a screen protector, carefully remove it and test the touchscreen. If the responsiveness improves, the protector might be too thick, poorly applied (trapping air bubbles or dust), or of low quality. Consider replacing it with a thinner, high-quality protector specifically designed for your Samsung model.
    • Why it helps: Some screen protectors can create a barrier that reduces the electrical conductivity required for touch detection.
    1. Restart Your Phone
    • How-To: Press and hold the Power button, then tap “Restart.”
    • Why it helps: A simple restart can often resolve temporary software glitches that might be affecting touchscreen responsiveness. It clears the RAM and restarts all background processes.
    1. Update Software
    • How-To: Go to Settings > Software update > Download and install.
    • Why it helps: Software updates often include bug fixes, performance improvements, and sometimes even touch driver updates that can enhance screen responsiveness.
    1. Test in Safe Mode
    • How-To:
      1. Press and hold the Power button until the “Power off” option appears.
      2. Tap and hold the “Power off” option on the screen until “Safe mode” appears.
      3. Tap “Safe mode.” Your phone will restart in Safe Mode, disabling all third-party apps.
    • Why it helps: If your touchscreen works perfectly in Safe Mode, it indicates that a third-party app is causing the interference. You can then uninstall recently installed apps one by one until the issue is resolved.
    • Exit Safe Mode: Simply restart your phone normally.
    1. Clear Cache Partition
    • How-To: This method requires booting into recovery mode.
      1. Turn off your phone completely.
      2. Press and hold the Volume Up button and the Power button simultaneously until the Samsung logo appears, then release both buttons. (For some older models, it might be Volume Up + Home + Power).
      3. Use the Volume Down button to navigate to “Wipe cache partition.”
      4. Press the Power button to select it.
      5. Select “Yes” to confirm.
      6. Once complete, select “Reboot system now” and press the Power button.
    • Why it helps: Clearing the cache partition can resolve system-level glitches without deleting your personal data. It removes temporary system files that might be corrupted.
    1. Factory Reset (Last Resort)
    • How-To: This will wipe all data from your phone. BACK UP ALL IMPORTANT DATA FIRST!
      • Go to Settings > General management > Reset > Factory data reset.
      • Follow the on-screen prompts.
    • Why it helps: A factory reset returns your phone to its original state, eliminating any software corruption or conflicts that might be affecting the touchscreen. If the issue persists after a factory reset, it’s almost certainly a hardware problem.

    When to Seek Professional Repair

    If, after trying all these steps, your Samsung phone’s touchscreen still exhibits issues, especially if the diagnostic “Touch” test showed unresponsive areas, it’s highly likely to be a hardware problem. This often means the digitizer or the entire display assembly needs to be replaced. At this point, contact Samsung support or take your phone to an authorized service center for professional diagnosis and repair.

    Remember, modern touchscreen “calibration” isn’t about re-aligning points but ensuring optimal sensitivity and diagnosing underlying issues. By following these steps, you can effectively troubleshoot and improve your Samsung phone’s touchscreen performance.

    FAQ Section

    Q1: Can I truly “calibrate” my Samsung phone touchscreen like old phones?

    A1: No, modern Samsung phones use capacitive touchscreens that are self-calibrating. They don’t require the type of manual calibration (like touching specific dots or patterns) that older resistive touchscreens did. What people often refer to as “calibration” for modern phones is actually about optimizing sensitivity and diagnosing issues.

    Q2: What is the secret diagnostic code for Samsung phones to test the touchscreen?

    A2: The secret diagnostic code is *#0*#. Enter this into your phone’s dialer app, and the diagnostic menu will appear automatically. From there, you can select the “Touch” test to check for unresponsive areas on your screen.

    Q3: My touchscreen feels less responsive after putting on a screen protector. What should I do?

    A3: First, check if your Samsung phone has a “Touch sensitivity” setting (usually found under Settings > Display). Enabling this feature can significantly improve responsiveness through screen protectors. If the problem persists, the screen protector might be too thick or poorly applied, and you might consider replacing it with a thinner, high-quality one.

    Q4: Will a factory reset fix a completely unresponsive touchscreen?

    A4: A factory reset can fix touchscreen issues caused by software glitches or corruption. However, if your touchscreen is completely unresponsive due to physical damage or a hardware malfunction, a factory reset will not fix it. In such cases, a hardware repair (like screen replacement) is necessary. Always back up your data before a factory reset.

    Q5: What does the “Touch sensitivity” setting do on Samsung phones?

    A5: The “Touch sensitivity” setting (found in Display settings) enhances the screen’s responsiveness to touch input. It’s particularly useful when using screen protectors, as it helps the screen register touches more accurately through the additional layer of glass or plastic.

    Q6: I tested my touchscreen with the diagnostic code, and some areas don’t respond. What does this mean?

    A6: If the diagnostic “Touch” test shows unresponsive or “dead” areas on your screen, it indicates a hardware problem, most likely with the digitizer (the touch-sensing layer) within your phone’s display. This issue cannot be fixed by software “calibration” or troubleshooting and will require professional repair or screen replacement.

  • How to Pair Samsung Galaxy Buds with iPhone

    How to Pair Samsung Galaxy Buds with iPhone

    Samsung Galaxy Buds are popular wireless earbuds known for their comfortable fit, sound quality, and integration with the Samsung ecosystem. However, they are fundamentally Bluetooth earbuds, meaning they adhere to the Bluetooth standard for wireless communication. This global standard allows devices from different manufacturers to connect and communicate, making cross-platform pairing possible. The history of Bluetooth itself dates back to 1994 when Ericsson’s Dr. Jaap Haartsen invented it as a wireless alternative to cables, paving the way for the myriad of wireless audio devices we use today.

    While the pairing process for Galaxy Buds is optimized for Samsung Galaxy phones (often involving a quick pop-up connection), connecting them to an Apple iPhone is just as simple, though with some feature limitations.

    Step 1: Prepare Your Samsung Galaxy Buds for Pairing

    Before you begin, ensure your Galaxy Buds are charged and in pairing mode.

    1. Charge Your Buds: Make sure both your Galaxy Buds earbuds and their charging case have sufficient battery. Place the earbuds inside the charging case.
    2. Enter Pairing Mode:
      • For most Galaxy Buds models (e.g., Buds2, Buds2 Pro, Buds FE, original Buds): Open the charging case lid. The earbuds will automatically enter Bluetooth pairing mode. The LED indicator inside the case (or on the front of the case, depending on the model) should start flashing a distinctive color (often blue, or red/green/blue alternating) to indicate it’s discoverable.
      • For older models like Galaxy Buds+ or Galaxy Buds Live: You might need to put the earbuds in your ears and then touch and hold both touchpads simultaneously for a few seconds until you hear a “pairing mode” sound.
      • For some newer models (e.g., Buds3/3 Pro): Put the earbuds inside the case, leave the lid open, and then press and hold a small button on the back of the case for about 5-10 seconds until the indicator flashes.

    Note: If your Galaxy Buds were previously paired to another device (like a Samsung phone), ensure Bluetooth is turned off on that device or disconnect them first to prevent automatic reconnection and allow them to enter pairing mode for your iPhone.

    Step 2: Enable Bluetooth on Your iPhone

    Your iPhone needs to be actively searching for Bluetooth devices.

    1. Open iPhone Settings: Tap the “Settings” app icon on your iPhone’s home screen.
    2. Go to Bluetooth: Tap on “Bluetooth” in the Settings menu.
    3. Ensure Bluetooth is On: Make sure the Bluetooth toggle at the top of the screen is switched On. If it’s already on, toggle it off and then on again to refresh the list of available devices.

    Step 3: Connect Your Galaxy Buds to Your iPhone

    Now that both devices are ready, you can establish the connection.

    1. Scan for Devices: Your iPhone will automatically start searching for nearby Bluetooth devices.
    2. Select Your Galaxy Buds: Look for your Samsung Galaxy Buds in the “OTHER DEVICES” list. They will typically appear with a name like “Galaxy Buds2 Pro,” “Galaxy Buds FE,” or simply “Galaxy Buds.”
    3. Tap to Connect: Tap on the name of your Galaxy Buds. Your iPhone will attempt to establish a connection.
    4. Confirm Connection: Once successfully paired, the name of your Galaxy Buds will move to the “MY DEVICES” list and show “Connected.” You might hear a connection sound from your earbuds.

    Troubleshooting Tip: If your Buds don’t appear, try turning off your iPhone’s Bluetooth and turning it back on, or close and reopen the Buds’ charging case to re-enter pairing mode.

    Step 4: Download and Use the Samsung Galaxy Buds App (Optional, but Recommended for Some Models)

    While basic audio functionality works via Bluetooth alone, Samsung offers a dedicated app for iOS users that unlocks additional features for some Galaxy Buds models.

    1. Check App Store Compatibility:
      • Go to the Apple App Store on your iPhone.
      • Search for “Samsung Galaxy Buds”.
      • Important Note: The specific app you need might vary by Buds model, and not all Galaxy Buds models are fully supported on iOS through an app.
        • The “Samsung Galaxy Buds” app on iOS primarily supports Galaxy Buds+ and Galaxy Buds Live.
        • As of now, models like Galaxy Buds (original SM-R170), Galaxy Buds Pro, Galaxy Buds2, Galaxy Buds2 Pro, and Galaxy Buds FE generally do not have a dedicated Galaxy Wearable or Galaxy Buds app for iOS that allows for full feature control or firmware updates. You’ll primarily rely on standard Bluetooth for these.
        • Always check the app description and compatibility list in the App Store for the most up-to-date information for your specific Buds model.
    2. Download and Install: If your model is supported, download and install the app.
    3. Open and Connect within the App:
      • Launch the Samsung Galaxy Buds app.
      • Follow the on-screen instructions to “Get started” and connect your already Bluetooth-paired Galaxy Buds within the app.

    What Features Work (and Don’t Work) on iPhone:

    When using Samsung Galaxy Buds with an iPhone, you gain essential functionality but miss out on some ecosystem-specific perks.

    • Working Features (via Bluetooth for all models):
      • Audio Playback: Listen to music, podcasts, and videos.
      • Call Audio: Make and receive phone calls.
      • Basic Touch Controls: Play/pause, skip tracks (double-tap), answer/end calls (double-tap), reject calls (touch and hold).
      • Battery Status: You can often see the battery level of the earbuds in your iPhone’s Bluetooth settings (next to the “Connected” status) or in the iPhone’s battery widget.
    • Working Features (with “Samsung Galaxy Buds” iOS App – for Buds+ and Buds Live):
      • Ambient Sound Control: Adjust how much surrounding noise you hear.
      • Active Noise Cancellation (ANC) Control: Turn ANC on/off (if your model has it, like Buds Live).
      • Equalizer (EQ) Settings: Customize sound profiles.
      • Touchpad Customization: Reassign touch and hold actions.
      • Find My Earbuds: Locate misplaced earbuds by making them emit a sound.
      • Firmware Updates: Crucially, this app allows you to update the earbuds’ software, which can improve performance and add features.
    • Limited or Non-Working Features on iPhone:
      • Automatic Device Switching: The seamless switching between Samsung devices is not available.
      • Gaming Mode/Low Latency Mode: These are often Samsung-exclusive features for reduced audio lag during gaming.
      • Seamless Earbud Pairing Pop-up: The instant pop-up window for quick pairing seen on Samsung phones is absent.
      • Bixby Voice Command: Accessing Samsung’s voice assistant is not possible. You will use Siri instead via a long-press on the touch control (if configured this way).
      • Spotify Integration/Notifications: Some Samsung-specific integrations are not available.
      • Full App Support for Newer Buds: As mentioned, newer models like Buds2 Pro, Buds2, Buds FE often lack a dedicated iOS app, limiting access to advanced settings and firmware updates. You might need an Android device or a Windows/Mac computer with the Samsung Buds Manager software to apply firmware updates for these models.

    In essence, while Galaxy Buds function well as standard Bluetooth headphones with an iPhone, the full suite of customization and smart features is best experienced within the Samsung ecosystem.

    Frequently Asked Questions (FAQ)

    Q1: Can all Samsung Galaxy Buds models connect to an iPhone?

    A1: Yes, all Samsung Galaxy Buds models (including original Buds, Buds+, Buds Live, Buds Pro, Buds2, Buds2 Pro, and Buds FE) can connect to an iPhone because they all use the universal Bluetooth standard for audio streaming.

    Q2: Do I need a special app to use my Galaxy Buds with an iPhone?

    A2: For basic audio playback and calls, no, you do not need a special app; they will connect like any other Bluetooth headphones. However, for certain advanced features like Ambient Sound control, EQ settings, touchpad customization, and firmware updates, you might need the “Samsung Galaxy Buds” app from the App Store. Be aware that this app currently only fully supports Galaxy Buds+ and Galaxy Buds Live. Newer models like Buds2 Pro or Buds FE typically do not have full app support on iOS.

    Q3: Can I update the firmware of my Galaxy Buds using my iPhone?

    A3: It depends on your Galaxy Buds model. If you have Galaxy Buds+ or Galaxy Buds Live, you can update their firmware directly through the “Samsung Galaxy Buds” app on your iPhone. For other models like Galaxy Buds (original), Buds Pro, Buds2, Buds2 Pro, or Buds FE, you generally cannot update the firmware via an iPhone app. You would typically need an Android device with the Galaxy Wearable app or a Windows/Mac computer with the Galaxy Buds Manager software to perform firmware updates.

    Q4: Will Active Noise Cancellation (ANC) or Ambient Sound work on my iPhone?

    A4: Yes, if your specific Galaxy Buds model has ANC or Ambient Sound features (like Galaxy Buds Pro, Buds2, Buds2 Pro, Buds Live, Buds FE), these features will generally work. However, how you control them varies. For Buds+ and Buds Live, you can control them via the dedicated iOS app. For models without full app support on iOS, you’ll typically rely on the earbuds’ physical touch controls (e.g., tap and hold) to toggle ANC or Ambient Sound modes, often cycling through the available modes.

    Q5: What features will I miss out on by using Galaxy Buds with an iPhone instead of a Samsung phone?

    A5: You’ll miss out on several ecosystem-specific features, including seamless automatic device switching between Samsung devices, specific low-latency gaming modes, Bixby voice assistant integration, and the instant pop-up pairing animation. Crucially, for many newer Galaxy Buds models (like Buds2 Pro, Buds2, Buds FE), you won’t have an iOS app to fully customize settings, adjust the equalizer, or perform firmware updates.

  • How to Set up Samsung Quick Share on Non-Samsung Devices

    How to Set up Samsung Quick Share on Non-Samsung Devices

    Quick Share, originally a Samsung-exclusive feature for rapid file sharing, has evolved significantly. In an exciting development for Android users, Google’s Nearby Share and Samsung’s Quick Share officially merged in January 2024, unifying under the Quick Share brand. This means that the enhanced Quick Share functionality is now broadly available across a wider range of Android devices and Windows PCs, moving beyond the Samsung ecosystem.

    This article provides a comprehensive guide on how to set up and use Quick Share on non-Samsung Android devices and Windows PCs, enabling seamless file transfers.

    Understanding Quick Share: A Unified File Sharing Standard

    Quick Share is a peer-to-peer file-sharing service that allows users to quickly send photos, videos, documents, and other files between nearby devices. It leverages technologies like Bluetooth Low Energy (BLE), Wi-Fi Direct, and sometimes even a cloud connection for sharing with contacts not in direct proximity.

    Historically, Samsung developed Quick Share for its Galaxy devices, offering a robust and speedy alternative to traditional sharing methods like Bluetooth. Google, on the other hand, had its own similar service called Nearby Share, available on most Android devices and Chromebooks. The existence of two similar but separate standards created a fragmented experience for Android users.

    The merger of Nearby Share and Quick Share under the Quick Share name signifies a major step towards a more unified and streamlined file-sharing experience across the Android and Windows ecosystems. This collaboration between Google and Samsung aims to provide a consistent and efficient way for users to share content, regardless of their device manufacturer. For users, this means improved compatibility and less confusion when transferring files between different Android phones and Windows PCs.

    Setting Up Quick Share on Non-Samsung Android Devices

    If you have a non-Samsung Android phone, chances are Quick Share is already integrated as part of your Google Play Services. This means you likely won’t need to download a separate app from the Play Store.

    Step 1: Ensure Your Android Device is Up to Date

    Quick Share functionality is typically available on Android 6.0 (Marshmallow) and higher. To ensure you have the latest features and stability:

    • Go to Settings on your Android phone.
    • Scroll down and tap on System or About phone.
    • Look for System update or Software update and ensure your device is running the latest available Android version and that Google Play system updates are current.

    Step 2: Access Quick Share Settings

    Quick Share settings are usually found within your device’s overall settings or the quick settings panel.

    1. Open Quick Settings: Swipe down twice from the top of your screen to fully expand the Quick Settings panel.
    2. Find Quick Share Tile: Look for the Quick Share tile (it might have replaced the “Nearby Share” tile if you had it previously). If you don’t see it, you might need to edit your Quick Settings tiles by tapping the pencil icon or “Edit” button and dragging the Quick Share tile into your active panel.
    3. Tap the Quick Share Tile: Tapping this tile will usually open a pop-up or take you to a dedicated Quick Share settings screen.

    Step 3: Configure Device Visibility

    This is a crucial step to ensure other devices can discover and share files with your phone.

    1. On the Quick Share settings screen, you will typically find options for “Device visibility” or “Who can share with you.”
    2. Choose one of the following options:
      • Everyone: Your device is visible to anyone nearby with Quick Share turned on. This is the most convenient but least private option. It often includes an “Only for 10 minutes” option to automatically revert to a more private setting.
      • Contacts: Your device is visible only to your Google contacts who are nearby and also have Quick Share enabled.
      • Your devices: Your device is visible only to other devices logged into the same Google Account. This is ideal for transferring files between your own phone, tablet, and PC.
      • No one: Your device is not visible and cannot receive files via Quick Share.

    For easy sharing with others, “Everyone” (with the 10-minute timeout) or “Contacts” are generally recommended.

    Step 4: Enable Required Connectivity

    Quick Share relies on Bluetooth and Wi-Fi to function.

    • Ensure Bluetooth is turned on.
    • Ensure Wi-Fi is turned on. You don’t necessarily need to be connected to a Wi-Fi network, but having Wi-Fi enabled allows Quick Share to use Wi-Fi Direct for faster transfers.

    Setting Up Quick Share on Non-Samsung Windows PC

    Samsung has updated its Quick Share for Windows application to support non-Samsung Windows PCs, which is a significant improvement from its earlier exclusivity. However, there’s a specific hardware requirement to keep in mind.

    Step 1: Check Your PC’s Compatibility

    To install and use the Samsung Quick Share app from the Microsoft Store on a non-Samsung PC, your computer needs specific Intel drivers:

    • Intel Bluetooth driver: Version 22.50.02 or higher.
    • Intel Wi-Fi driver: Version 22.50.07 or higher.

    If your Windows PC has a network card from a different manufacturer (e.g., MediaTek, Realtek, Qualcomm), the Samsung Quick Share app from the Microsoft Store might not work. In such cases, you will use the Google Quick Share app for Windows.

    Step 2: Download and Install the Quick Share App

    There are now two primary Quick Share applications for Windows, depending on your hardware and preference. With the merger, both should offer similar functionality for sharing with Android devices.

    Option A: Samsung Quick Share (from Microsoft Store)

    This is the updated Samsung-branded app that now supports non-Samsung PCs with compatible Intel hardware.

    1. Open Microsoft Store: On your Windows PC, open the Microsoft Store application.
    2. Search for “Quick Share”: Type “Quick Share” into the search bar.
    3. Install “Quick Share” by Samsung Electronics Co, Ltd.: Download and install the application.
    4. Launch the App: Once installed, open the Quick Share app.
    5. Sign in (Optional, but Recommended): While not strictly required for basic file transfer to anyone nearby, signing in with your Samsung account can enable features like sharing to your own devices or to contacts.
    6. Configure Visibility: In the Quick Share app settings on your PC, set your “Who can share with you” preference (Everyone, Contacts, or Your devices) to match your sharing needs.

    Option B: Google Quick Share (from Android.com)

    This version is provided directly by Google and is essentially the rebranded Nearby Share app for Windows. It is generally more broadly compatible with different PC hardware.

    1. Go to the Official Google Android Website: Open your web browser and navigate to android.com/better-together/quick-share-app/ (or search for “Quick Share for Windows” by Google).
    2. Download the Installer: Click the “Get the app” or “Download now” button to download the installer file (e.g., BetterTogetherSetup.exe).
    3. Run the Installer: Locate the downloaded file and run it. Follow the on-screen prompts to install the Quick Share app.
      • Note: You might get a warning that the installer could be dangerous. As long as you download it from the official Google source, it should be safe.
    4. Launch the App and Sign In: Open the installed Quick Share app. You will be prompted to sign in with your Google Account. This is crucial for connecting with your Android devices and contacts.
    5. Configure Visibility: In the Quick Share app, select your preferred “Device visibility” (Everyone, Contacts, Your devices, or No one).

    Step 3: Enable Bluetooth and Wi-Fi on Your PC

    Just like on your phone, your Windows PC needs Bluetooth and Wi-Fi enabled for Quick Share to work.

    • Go to Settings on your PC (Windows Key + I).
    • Navigate to Bluetooth & devices and ensure Bluetooth is toggled On.
    • Go to Network & internet and ensure Wi-Fi is toggled On.

    How to Share Files Between Devices

    Once Quick Share is set up on both your non-Samsung Android phone and your Windows PC, sharing files is straightforward.

    Sharing from Android Phone to Windows PC

    1. Select Files: On your Android phone, open your Gallery, Files app, or any application containing the content you want to share. Select the photos, videos, or documents.
    2. Tap Share Icon: Tap the universal Share icon (usually three dots connected or an arrow).
    3. Choose Quick Share: From the sharing options, select Quick Share.
    4. Select PC: Your Windows PC (with Quick Share open and visible) should appear in the list of nearby devices. Tap on your PC’s name.
    5. Accept on PC: A notification will pop up on your Windows PC asking you to accept the incoming file. Click Accept.
    6. Transfer Initiates: The files will begin transferring. You’ll see a progress indicator on both devices.

    Sharing from Windows PC to Android Phone

    1. Open Quick Share App: Launch the Quick Share app on your Windows PC.
    2. Select Files:
      • You can drag and drop files directly into the Quick Share app window.
      • Alternatively, click “Select files” or “Select folders” within the app and browse for the content.
      • Another convenient way is to right-click on a file or folder in File Explorer, then select “Send with Quick Share” from the context menu.
    3. Select Android Device: Your non-Samsung Android phone (with Quick Share enabled and visible) should appear in the list of nearby devices. Click on your phone’s name.
    4. Accept on Phone: A pop-up notification will appear on your Android phone asking to accept the shared files. Tap Accept.
    5. Transfer Initiates: The files will begin transferring. They will typically be saved in your phone’s “Downloads” folder or a specific “Quick Share” folder in your gallery for media.

    Sharing via QR Code (for devices not appearing)

    If a device isn’t showing up in the direct discovery list (e.g., due to compatibility issues, or distance), Quick Share offers a QR code option.

    1. Initiate Share: On the sending device (either phone or PC), follow the steps to select files and start the Quick Share process.
    2. Select QR Code Option: Instead of choosing a device from the list, look for an option like “Share with QR code” or “Use QR code.”
    3. Scan QR Code: On the receiving device, open its camera app or a dedicated QR code scanner. Point it at the QR code displayed on the sending device.
    4. Accept Link: Scanning the QR code will typically open a web link where the recipient can download the shared files.

    Troubleshooting Tips

    • Devices Not Discovering Each Other:
      • Ensure Bluetooth and Wi-Fi are enabled on both devices.
      • Bring devices closer together (within 16 feet or 5 meters).
      • Check the visibility settings on both devices (e.g., “Everyone,” “Contacts”).
      • Restart the Quick Share app on both devices.
      • Temporarily toggle Airplane mode on and off on both devices.
    • Slow Transfer Speeds:
      • Ensure both devices are connected to the same Wi-Fi network if possible, as Wi-Fi Direct often provides faster speeds than Bluetooth.
      • Reduce the number or size of files being transferred.
      • Minimize other network activity on both devices.
    • Transfer Fails:
      • Check if there’s enough storage space on the receiving device.
      • Ensure the Quick Share app or service is not blocked by a firewall on your PC.
      • Try restarting both devices.
    • Samsung Quick Share on PC not installing/working on non-Intel PCs:
      • This is a known limitation. If your PC does not have Intel Wi-Fi and Bluetooth drivers that meet the version requirements, the Samsung Quick Share app from the Microsoft Store will not install or function correctly. Use the Google Quick Share app from android.com instead, as it has broader hardware compatibility.

    Frequently Asked Questions (FAQ)

    Q1: Do I need a Samsung account to use Quick Share on a non-Samsung PC?

    No, you do not strictly need a Samsung account to use Quick Share on a non-Samsung PC. If you use the Google Quick Share app (downloaded from android.com), you will sign in with your Google Account, which enables sharing with your other Android devices. If you use the Samsung Quick Share app from the Microsoft Store (on compatible Intel PCs), you can use it without signing in to a Samsung account for general “Everyone” sharing. However, a Samsung account might offer tighter integration for specific Samsung-to-Samsung features.

    Q2: Is Quick Share available on iOS (iPhone/iPad) devices?

    No, Quick Share is an Android and Windows ecosystem feature. It is not directly compatible with iOS devices. For sharing between Android/Windows and iOS, you would typically use alternative methods like cloud storage (Google Drive, Dropbox), email, or third-party cross-platform file-sharing apps.

    Q3: What is the maximum file size I can share with Quick Share?

    When sharing directly between nearby devices, Quick Share generally has no practical limit on the content size or number of files. However, if you choose to share via a QR code or link that uploads to a cloud service for remote sharing, there might be size limits (e.g., typically 3GB per file for QR code uploads, and 10GB per file/day for generated links as of recent updates).

    Q4: My Windows PC isn’t Samsung, and it doesn’t have Intel Wi-Fi/Bluetooth. Can I still use Quick Share?

    Yes! If your non-Samsung PC does not meet the Intel driver requirements for the Samsung Quick Share app from the Microsoft Store, you should download and install the Google Quick Share app for Windows from android.com. This version has broader hardware compatibility and allows seamless sharing with your Android devices using your Google Account.

    Q5: What happened to Nearby Share?

    In January 2024, Google and Samsung officially merged their respective file-sharing technologies, Nearby Share and Quick Share, under the unified brand name Quick Share. This means Nearby Share has been rebranded and integrated into the broader Quick Share experience across Android and Windows devices. The core functionality remains, but under a more consistent name.

  • How to Recover Deleted Photos from Samsung Gallery

    How to Recover Deleted Photos from Samsung Gallery

    Accidentally deleting cherished photos from your Samsung Galaxy phone’s Gallery can be a distressing experience. Whether it’s a mis-tap, a mass cleanup gone wrong, or a factory reset, losing those visual memories can feel permanent. However, it’s often possible to recover deleted photos thanks to built-in features and various recovery methods. This comprehensive “how-to” guide will walk you through every possible solution, from quick fixes to more advanced techniques.

    When a photo is “deleted” from your Samsung Gallery, it’s usually not immediately erased from your device’s memory. Instead, its space is marked as available to be overwritten by new data. This is why acting quickly after deletion increases your chances of successful recovery. The more you use your phone after deletion, the higher the risk of the photos being permanently overwritten.

    Understanding Where Deleted Photos Go

    Before diving into recovery methods, it’s crucial to understand how Samsung Gallery handles deletions and where photos might be temporarily stored:

    • Recycle Bin/Trash: Like a computer’s Recycle Bin, Samsung Gallery has a similar feature that temporarily holds deleted photos and videos for a set period (usually 15 to 30 days) before permanent deletion. This is your first and easiest recovery point.
    • Cloud Backup Services: Many Samsung Galaxy users utilize cloud services like Samsung Cloud, Google Photos, or Microsoft OneDrive to automatically back up their photos. If enabled, your deleted photos might still exist in your cloud backup.
    • Device Internal Storage/SD Card: Even after being removed from the Recycle Bin, the actual data of the photos might still reside on your phone’s internal storage or an inserted SD card until new data overwrites it. This is where specialized data recovery software comes into play.

    Method 1: Recovering from Samsung Gallery’s Recycle Bin (Trash)

    The Recycle Bin is the most straightforward way to recover deleted photos from your Samsung Gallery. This feature was introduced to provide a safety net for accidental deletions.

    Step-by-Step Guide:

    1. Open the Gallery App: On your Samsung Galaxy phone, tap to open the Gallery application.
    2. Access More Options: Tap on the three horizontal lines or three dots icon (hamburger menu or More options) usually located in the bottom right or top right corner of the screen.
    3. Select Recycle Bin/Trash: From the menu that appears, look for and tap on “Recycle Bin” or “Trash”.
    4. Find and Restore Photos: You will see all the photos and videos that have been deleted recently. They are typically held here for 15 to 30 days, depending on your device’s settings.
      • Tap and hold on the photos you wish to recover.
      • Select multiple photos if needed.
      • Tap the “Restore” or “Recover” icon (usually an arrow pointing in a circular motion, or a simple “Restore” button) at the bottom or top of the screen.
    5. Verify Recovery: The selected photos will be moved back to their original albums within your Gallery.

    Important Note: The Recycle Bin feature must be enabled in your Gallery settings for this to work. It’s usually on by default on newer Samsung Galaxy phones. If you cannot find it, check your Gallery settings.

    Method 2: Recovering from Cloud Backups (Samsung Cloud, Google Photos, OneDrive)

    Cloud backup services are lifesavers when it comes to data loss. If you’ve set up automatic backups, your deleted photos are likely safe in the cloud.

    Option A: Samsung Cloud

    Samsung Cloud is a built-in backup solution for Samsung Galaxy devices.

    Step-by-Step Guide:

    1. Access Samsung Cloud Settings:
      • Go to your phone’s Settings.
      • Scroll down and tap on “Accounts and backup”.
      • Tap on “Samsung Cloud”.
    2. Restore Data:
      • Under “Backup and restore”, tap on “Restore data”.
      • Select your Samsung Galaxy phone from the list (if you have multiple backups).
      • Choose “Gallery” from the list of data to restore.
      • Tap “Restore”.

    Note: This will restore photos from the last backup. If the photos were deleted before the last backup, they might not be in Samsung Cloud.

    Option B: Google Photos

    Google Photos is an incredibly popular and powerful cloud storage service, often pre-installed on Samsung Galaxy phones. If you’ve synced your Gallery with Google Photos, your deleted photos might be there.

    Step-by-Step Guide:

    1. Open Google Photos App: Launch the Google Photos app on your Samsung Galaxy phone.
    2. Check Library/Trash:
      • Tap on “Library” at the bottom of the screen.
      • Look for the “Trash” or “Bin” folder (it might be under “Utilities” or directly visible).
    3. Restore Photos:
      • Similar to the Samsung Gallery Recycle Bin, photos deleted from Google Photos (and often from your device if synced) are held in the Trash for 60 days before permanent deletion.
      • Select the photos you want to recover.
      • Tap the “Restore” icon (an arrow pointing in a circular motion).
    4. Check for Synced Photos: Even if you deleted photos from your Samsung Gallery, if they were backed up to Google Photos before deletion, they will still be available in your main Google Photos library (not necessarily in the Trash) unless you deleted them from within the Google Photos app itself.

    Option C: Microsoft OneDrive

    Some Samsung Galaxy devices, especially newer models, integrate Microsoft OneDrive for photo backup.

    Step-by-Step Guide:

    1. Open OneDrive App: Launch the OneDrive app on your Samsung Galaxy phone.
    2. Navigate to Photos/Recycle Bin:
      • Tap on the “Photos” tab to see your backed-up photos.
      • If you deleted them from OneDrive, check the “Me” tab, then “Recycle Bin”.
    3. Restore: Select the photos and choose the “Restore” option.

    Method 3: Using Data Recovery Software (for Photos Not in Recycle Bin/Cloud)

    If the photos are no longer in your Gallery’s Recycle Bin and were not backed up to the cloud, specialized data recovery software is your last resort. These tools scan your phone’s internal memory or SD card for remnants of deleted files.

    Crucial Advice:

    • Stop using your phone immediately: Any new data written to your phone can overwrite the deleted photos, making them unrecoverable.
    • Do not save new files: Avoid taking new photos, downloading apps, or receiving messages.
    • Rooting might be required: Some advanced data recovery software might require your Samsung Galaxy phone to be “rooted” to access the deeper file system. Rooting can void your warranty and carries risks, so proceed with caution. Many tools offer non-rooted recovery for a shallower scan.

    Popular Data Recovery Software Options (PC-based):

    You will typically need to connect your Samsung Galaxy phone to a computer to use these tools.

    1. Dr.Fone – Data Recovery (Android):
      • How it works: Download and install Dr.Fone on your computer. Connect your Samsung Galaxy phone to the computer using a USB cable. Enable USB debugging on your phone (Go to Settings > About phone > Software information > Tap Build number 7 times to enable Developer options. Then go to Settings > Developer options > Enable USB debugging).
      • Process: Launch Dr.Fone, select “Data Recovery,” and follow the on-screen prompts to scan your phone for deleted photos. It will typically show a preview of recoverable items.
      • Pros: User-friendly interface, supports various data types, often has a free scan feature.
      • Cons: Requires a paid license for full recovery. Rooting might be suggested for deeper scans.
    2. EaseUS MobiSaver for Android:
      • How it works: Similar to Dr.Fone, install EaseUS MobiSaver on your PC, connect your Samsung phone via USB, and enable USB debugging.
      • Process: The software will detect your device and allow you to scan for deleted data, including photos.
      • Pros: Good reputation for data recovery, straightforward process.
      • Cons: Paid software, rooting might be necessary for comprehensive recovery.
    3. Tenorshare UltData for Android:
      • How it works: Follow the same steps as other PC-based software: install, connect, enable USB debugging.
      • Process: Scan your device’s internal storage or SD card for lost photos.
      • Pros: Claims high success rates, supports a wide range of Android devices.
      • Cons: Premium software, potential need for rooting.

    Step-by-Step Guide for PC-based Software (General):

    1. Download and Install: Download the chosen data recovery software on your Windows PC or Mac. Install it according to the instructions.
    2. Enable USB Debugging: On your Samsung Galaxy phone:
      • Go to Settings > About phone > Software information.
      • Tap “Build number” seven times rapidly until you see “Developer options have been enabled.”
      • Go back to Settings > Developer options.
      • Toggle on “USB debugging”.
    3. Connect Phone to PC: Connect your Samsung Galaxy phone to your computer using a reliable USB cable.
    4. Launch Software & Scan:
      • Open the data recovery software on your PC.
      • The software should detect your phone. Follow the on-screen prompts to select “Photos” as the data type to scan.
      • Initiate the scan. This can take a considerable amount of time depending on the storage size and amount of data.
    5. Preview and Recover:
      • Once the scan is complete, the software will display a preview of recoverable photos.
      • Select the photos you wish to restore.
      • Choose a destination folder on your computer to save the recovered photos. Do not save them back to your phone directly at this stage, as this could overwrite other unrecovered data.

    Recovery from SD Card: If your photos were stored on an SD card, you can remove the SD card from your phone and connect it directly to your computer using an SD card reader. Then, use the same data recovery software to scan the SD card. This method is generally safer and often yields better results as it bypasses the complexities of Android’s internal storage permissions.

    Preventing Future Photo Loss

    The best recovery method is always prevention. Here are key practices to safeguard your photos:

    • Enable Gallery Recycle Bin: Ensure this feature is always turned on in your Samsung Gallery settings.
    • Automated Cloud Backups:
      • Google Photos: Set up automatic backup and sync for your photos and videos. This is highly recommended as it provides free (albeit sometimes compressed) storage and excellent search capabilities.
      • Samsung Cloud: Utilize Samsung Cloud for backing up your Gallery.
      • Microsoft OneDrive: If you use OneDrive, ensure your camera roll is set to automatically upload.
    • Regular Manual Backups: Periodically transfer your photos to a computer, external hard drive, or USB flash drive.
    • Use SD Cards (if applicable): While not a primary backup, an SD card can offer a separate storage location. If your phone’s internal storage is corrupted, photos on the SD card might remain safe (though SD cards can also fail).
    • Be Mindful When Deleting: Always double-check before deleting photos, especially when performing bulk deletions.

    Frequently Asked Questions (FAQ)

    Q1: How long do deleted photos stay in the Samsung Gallery Recycle Bin?

    Deleted photos and videos typically remain in the Samsung Gallery Recycle Bin for 15 to 30 days before being permanently deleted, depending on your Samsung Galaxy model and Gallery app version.

    Q2: Can I recover photos deleted permanently from my Samsung Galaxy?

    If photos are permanently deleted (i.e., removed from the Recycle Bin or after the 15-30 day period), your best chance is through cloud backups (like Google Photos or Samsung Cloud) or by using specialized data recovery software on a computer. The success rate with software decreases significantly if you continue to use your phone after deletion, as new data can overwrite the old.

    Q3: Do I need to root my Samsung phone to recover deleted photos?

    For basic recovery from the Recycle Bin or cloud backups, no rooting is needed. However, some deep scan data recovery software might require your Samsung Galaxy phone to be rooted to access the underlying file system and recover photos that have been “permanently” deleted. Be aware that rooting can void your warranty.

    Q4: Will factory resetting my Samsung phone delete all my photos permanently?

    Yes, a factory reset will erase all data, including photos, from your Samsung Galaxy phone’s internal storage. While some data recovery software might attempt to recover data after a factory reset, the chances of success are significantly lower. Always back up your photos before performing a factory reset.

    Q5: What is the best free way to recover deleted photos from a Samsung phone?

    The best free method is to check your Samsung Gallery’s Recycle Bin first. If that doesn’t work, check your Google Photos or Samsung Cloud backups, as these are typically free services for basic usage. PC-based data recovery software often offers a free scan but usually requires payment for the actual recovery.

    Q6: Can I recover photos from a broken Samsung phone screen?

    If your Samsung phone’s screen is broken but the phone is still functional (e.g., you can hear notifications), you might be able to connect it to a computer and access its files directly, provided USB debugging was enabled and you can authorize the connection. If not, and you have cloud backups, you can access your photos from there. For severely damaged phones, professional data recovery services might be an option, but they are often expensive.

  • How to Share Wi-Fi from Your Samsung Mobile

    How to Share Wi-Fi from Your Samsung Mobile

    In today’s connected world, a reliable internet connection is essential. Your Samsung mobile phone is not just a device for making calls or Browse; it’s a powerful hub that can extend internet access to other devices. Whether you’re on the go and need to get your laptop online, or a friend needs temporary Wi-Fi access, your Samsung Galaxy device offers several convenient methods to share Wi-Fi.

    The concept of sharing your phone’s internet connection, often referred to as tethering or creating a hotspot, has been a fundamental feature of smartphones for years. Historically, this primarily involved sharing your phone’s mobile data connection. However, Samsung Galaxy phones have evolved to offer more advanced options, including the ability to share an existing Wi-Fi connection (acting as a Wi-Fi extender) and even quick password sharing via QR codes. These features leverage the phone’s robust network capabilities, making it a versatile tool for connectivity.

    This guide will comprehensively cover the various ways to share Wi-Fi from your Samsung mobile, ensuring you can get all your devices, and those of others, online with ease.

    Method 1: Using Mobile Hotspot (Sharing Mobile Data)

    This is the most common way to share internet access. Your Samsung phone acts as a portable Wi-Fi router, converting your mobile data (4G, 5G) into a Wi-Fi signal that other devices can connect to.

    Step 1: Access Mobile Hotspot Settings

    1. From Quick Settings:
      • Swipe down twice from the top of your screen to fully expand the Quick Settings panel.
      • Look for the “Mobile Hotspot” icon (it often looks like a Wi-Fi signal or a square with waves). Tap and hold this icon to jump directly to the Mobile Hotspot settings.
    2. From Settings App:
      • Open the Settings app on your Samsung mobile.
      • Tap Connections.
      • Tap Mobile Hotspot and Tethering.
      • Tap Mobile Hotspot.

    Step 2: Configure Your Hotspot (Optional but Recommended)

    Before turning it on, it’s a good idea to configure your hotspot for security and ease of use.

    1. Tap “Configure” (or “Network name” / “Password” directly): On the Mobile Hotspot screen, you’ll usually see a “Configure” button or direct editable fields for Network name and Password. Tap on it.
    2. Set Network Name (SSID): Change the Network name (SSID) to something easily recognizable (e.g., “My Galaxy Hotspot”).
    3. Set Security: Choose WPA2-Personal (recommended for strong security). Avoid “None” as it leaves your network open.
    4. Set Password: Create a strong, memorable password. This prevents unauthorized access to your hotspot and mobile data.
    5. Band (Optional): You might be able to choose between 2.4 GHz (better range, more compatible with older devices) and 5 GHz (faster speeds, shorter range).
    6. Save: Tap Save to apply your changes.

    Step 3: Turn On Mobile Hotspot

    1. Toggle On: On the Mobile Hotspot screen, tap the toggle switch next to “Mobile Hotspot” to turn it On.
    2. Status Bar Icon: You will see a small hotspot icon in your phone’s status bar, indicating it’s active.

    Step 4: Connect Other Devices

    1. On the Other Device: On the device you want to connect (laptop, tablet, another phone), go to its Wi-Fi settings.
    2. Find Network: Scan for available Wi-Fi networks. You should see the Network name you set up earlier.
    3. Enter Password: Select your hotspot’s network name and enter the password you created.
    4. Connect: Tap Connect. The other device should now have internet access through your Samsung mobile’s mobile data.

    Method 2: Wi-Fi Sharing (Acting as a Wi-Fi Extender/Repeater)

    This less common but incredibly useful feature allows your Samsung mobile to share an existing Wi-Fi connection (e.g., from a hotel Wi-Fi or a public hotspot) with other devices. Your phone acts as a Wi-Fi repeater or extender.

    Note: The availability and exact location of this feature can vary across Samsung Galaxy models and One UI versions. It’s sometimes integrated within the Mobile Hotspot settings as an “Advanced” option, or explicitly labeled “Wi-Fi sharing.” Not all carriers or older phones support this.

    Step 1: Connect Your Phone to an Existing Wi-Fi Network

    1. Ensure your Samsung mobile is already connected to the Wi-Fi network you wish to share.

    Step 2: Access Mobile Hotspot Settings

    1. Go to Settings > Connections > Mobile Hotspot and Tethering > Mobile Hotspot.

    Step 3: Enable Wi-Fi Sharing (Location Varies)

    1. Look for “Wi-Fi Sharing” Toggle:
      • On some Samsung models (especially newer ones with One UI 4.0+), you might find a dedicated “Wi-Fi sharing” toggle directly on the main Mobile Hotspot screen, or within an “Advanced” section.
      • Sometimes, you need to first enable the Mobile Hotspot toggle (which will try to use mobile data initially), then look for “Wi-Fi sharing” within the “Configure” options or in an “Advanced” menu accessible from the hotspot settings.
      • In older One UI versions, this might be less prominent or even require turning on the hotspot first, then going into its settings to find the Wi-Fi sharing option.
    2. Toggle On: Turn the “Wi-Fi sharing” toggle On.
      • When Wi-Fi sharing is active, your phone will use its existing Wi-Fi connection for the hotspot, rather than mobile data.

    Step 4: Connect Other Devices

    1. The steps for connecting other devices are the same as Method 1 (Mobile Hotspot). They will connect to your Samsung phone’s hotspot name and password.

    Method 3: Sharing Wi-Fi Passwords via QR Code (Quick & Secure)

    For quickly sharing the password of a Wi-Fi network your Samsung phone is already connected to, without revealing the password itself.

    Step 1: Go to Wi-Fi Settings

    1. Open Settings: Go to the Settings app.
    2. Tap Connections: Tap Connections.
    3. Tap Wi-Fi: Tap Wi-Fi.

    Step 2: Generate the QR Code

    1. Tap Gear Icon: Next to the Wi-Fi network you are currently connected to (and want to share), tap the gear icon (settings icon).
    2. Tap QR Code: On the network details screen, look for and tap the QR code icon or “QR code” button at the bottom of the screen.
    3. Authenticate: You might be asked to verify your identity (fingerprint, PIN, or pattern) for security.
    4. Display QR Code: Your Samsung mobile will display a QR code for the Wi-Fi network.

    Step 3: Scan with Another Device

    1. On the Other Device: Open its camera app or a dedicated QR code scanner app.
    2. Scan QR Code: Point the camera at the QR code displayed on your Samsung phone.
    3. Connect: The other device will recognize the network and prompt you to connect. Tap to join the network without needing to manually type the password.

    Method 4: USB Tethering (Sharing Mobile Data via Cable)

    If you only need to share your mobile data with one computer and prefer a wired connection for speed and stability.

    Step 1: Connect Phone to PC

    1. Connect your Samsung mobile to your computer using a USB cable.

    Step 2: Enable USB Tethering

    1. From Quick Settings:
      • Swipe down twice from the top of your screen.
      • Tap and hold the “Mobile Hotspot” icon.
    2. From Settings App:
      • Go to Settings > Connections > Mobile Hotspot and Tethering.
    3. Toggle USB Tethering On: Tap the toggle switch next to “USB tethering” to turn it On.
    4. Confirmation on PC: Your computer should detect a new network connection, and you will gain internet access.

    Method 5: Bluetooth Tethering (Sharing Mobile Data Wirelessly)

    Useful for sharing mobile data with devices that support Bluetooth internet tethering, typically for low-bandwidth tasks.

    Step 1: Pair Devices via Bluetooth

    1. Enable Bluetooth on Both Devices: Turn on Bluetooth on both your Samsung mobile and the device you want to connect.
    2. Pair Devices: In your Samsung phone’s Bluetooth settings, pair with the other device.

    Step 2: Enable Bluetooth Tethering

    1. Go to Settings: On your Samsung mobile, go to Settings > Connections > Mobile Hotspot and Tethering.
    2. Toggle Bluetooth Tethering On: Tap the toggle switch next to “Bluetooth tethering” to turn it On.

    Step 3: Connect on the Other Device

    1. On the Other Device: Go to its Bluetooth settings, find your paired Samsung phone, and look for an option to connect to the internet or use it as an access point. The exact steps vary by device.

    Important Considerations When Sharing Wi-Fi

    • Data Usage: Be mindful of your mobile data plan. Using Mobile Hotspot consumes data rapidly, especially with multiple connected devices or streaming.
    • Battery Drain: Sharing Wi-Fi, especially Mobile Hotspot, is battery-intensive. Keep your Samsung mobile plugged into a power source if you plan to use it for extended periods.
    • Carrier Restrictions: Some mobile carriers impose limits or additional charges for tethering or hotspot usage. Check with your carrier to avoid unexpected bills.
    • Speed: The speed of the shared Wi-Fi connection depends on your Samsung mobile’s mobile data speed or the speed of the Wi-Fi network it’s connected to.
    • Security: Always use a strong password for your Mobile Hotspot (WPA2-Personal) to prevent unauthorized users from accessing your network.

    Conclusion

    Your Samsung mobile phone is a versatile tool for connectivity, offering multiple robust ways to share Wi-Fi. Whether you need to leverage your mobile data via Mobile Hotspot, extend an existing Wi-Fi signal through Wi-Fi sharing, quickly grant access with a QR code, or establish a stable wired connection with USB tethering, your Samsung Galaxy device has you covered. Understanding these methods empowers you to ensure seamless internet access for yourself and those around you, wherever you are.

    FAQ

    Q1: What is the difference between “Mobile Hotspot” and “Wi-Fi sharing” on a Samsung phone?

    Mobile Hotspot shares your phone’s mobile data connection (4G/5G) with other devices, effectively turning your phone into a portable router. Wi-Fi sharing, on the other hand, allows your Samsung phone to share an existing Wi-Fi network it’s connected to with other devices, acting as a Wi-Fi extender or repeater. This means your phone doesn’t use its mobile data plan in this mode.

    Q2: Can I share Wi-Fi from my Samsung phone without using my mobile data?

    Yes! This is precisely what the “Wi-Fi sharing” feature (also known as Wi-Fi Repeater mode) does. If your Samsung mobile is connected to a Wi-Fi network, you can enable “Wi-Fi sharing” within the Mobile Hotspot settings, and your phone will then broadcast that existing Wi-Fi signal to other devices, using no mobile data.

    Q3: How do I find the password for my Samsung Mobile Hotspot?

    To find your Mobile Hotspot password:

    1. Go to Settings > Connections > Mobile Hotspot and Tethering > Mobile Hotspot.
    2. Tap on “Configure” (or sometimes directly on the Network name or Password field).
    3. Your current password will be displayed. You can also change it from here.

    Q4: Why is my Mobile Hotspot not working or very slow? A4: Several reasons can cause issues:

    • No mobile data: Ensure your phone has an active mobile data connection and sufficient data allowance.
    • Carrier restrictions: Some carriers might limit or charge extra for hotspot usage.
    • Poor signal: If your phone has a weak mobile data signal, the hotspot speed will also be slow.
    • Too many devices: Too many devices connected to the hotspot can slow it down.
    • Band selection: Try switching between 2.4 GHz and 5 GHz bands in the hotspot’s “Configure” settings. 2.4 GHz has better range, 5 GHz is faster.
    • Firewall/Antivirus: On the connecting device, temporarily disable any strict firewall or antivirus that might be blocking the connection.

    Q5: How can I share my Wi-Fi password with someone without saying it aloud?

    You can use the QR code sharing feature.

    1. On your Samsung mobile, go to Settings > Connections > Wi-Fi.
    2. Tap the gear icon next to the Wi-Fi network you are connected to.
    3. Tap the QR code icon at the bottom of the screen.
    4. The other person can then scan this QR code with their phone’s camera or a QR scanner app to automatically connect to the Wi-Fi network.

    Q6: Does using a mobile hotspot drain my Samsung phone’s battery quickly?

    Yes, using Mobile Hotspot significantly drains your phone’s battery faster than normal usage. Broadcasting a Wi-Fi signal and constantly using mobile data is power-intensive. It’s recommended to keep your Samsung mobile plugged into a charger if you plan to use the hotspot for an extended period.

    Q7: Can I limit the data usage for my Mobile Hotspot on Samsung?

    Yes, many Samsung Galaxy phones allow you to set a data limit for your Mobile Hotspot.

    1. Go to Settings > Connections > Mobile Hotspot and Tethering > Mobile Hotspot.
    2. Look for options like “Data limit” or “Mobile data shared today.”
    3. You can set a specific data amount after which the hotspot will automatically turn off.
  • How to Customize Samsung One UI with Good Lock 2025

    How to Customize Samsung One UI with Good Lock 2025

    Samsung’s One UI is widely praised for its clean design, intuitive navigation, and thoughtful features. However, for users who crave even deeper personalization and enhanced functionality beyond the standard settings, Samsung offers Good Lock. This official suite of customization tools, often referred to as a “power-user’s dream,” allows you to dramatically alter the look, feel, and behavior of your Samsung Galaxy phone.

    Historically, Good Lock was only available in select regions via the Galaxy Store. A significant change in 2025 is that Samsung has expanded Good Lock’s availability to all countries and made it downloadable directly from the Google Play Store, alongside the Galaxy Store. This expansion, coinciding with the release of One UI 7 and anticipated with One UI 8, makes Good Lock more accessible than ever, allowing more Galaxy users to truly make their device their own.

    This guide will walk you through the essential steps to install and utilize Good Lock and its various modules, transforming your Samsung Galaxy experience in 2025.

    Step 1: Installing Good Lock 2025

    The first step is to get the Good Lock application itself, which acts as the hub for all the individual customization modules.

    1. Download Good Lock:
      • Option 1 (Recommended for 2025): Google Play Store. Open the Google Play Store app on your Samsung Galaxy device. Search for “Good Lock” and download it. This is a significant change from previous years, making it globally accessible.
      • Option 2: Galaxy Store. Alternatively, you can still find it in the Galaxy Store. Open the Galaxy Store app, search for “Good Lock,” and install it.
    2. Open Good Lock:
      • Once installed, locate the Good Lock app icon on your home screen or in your app drawer and open it.

    Step 2: Understanding Good Lock Modules (Make Up & Life Up)

    Upon opening Good Lock, you’ll notice it’s divided into sections, typically “Make Up” (for visual customizations) and “Life Up” (for functional enhancements). Each section contains individual modules – mini-apps that each control a specific aspect of your phone’s UI or functionality. You need to download and install these modules separately.

    1. Browse Available Modules:
      • Scroll through the list of modules presented within the Good Lock app.
      • You’ll see categories like “Make Up” and “Life Up” that group similar modules.
    2. Install Individual Modules:
      • To use a module, you must first install it. Tap on the module you want to use.
      • You will be redirected to either the Google Play Store or Galaxy Store page for that specific module.
      • Tap “Install” or “Download” to add the module to your phone.
      • After installation, return to the Good Lock app. The module will now appear as “Installed” and ready to use.

    Step 3: Customizing with Popular Good Lock Modules in 2025

    Let’s explore some of the most popular and impactful Good Lock modules and how to use them to customize your Samsung One UI experience.

    1. LockStar (Customize Your Lock Screen and Always On Display)

    LockStar gives you unparalleled control over your lock screen and Always On Display (AOD).

    • How to Use: Open Good Lock, tap LockStar. Toggle it on.
    • Key Features (2025 updates focus on more layout flexibility and widget support):
      • Layout Editor: Drag and drop elements like the clock, notifications, music player, and app shortcuts to any position on the screen. This offers far more freedom than standard One UI.
      • Clock Styles: Choose from a wide variety of clock designs and sizes.
      • Widget Integration: Add more widgets and customize their appearance directly on the lock screen.
      • Interactive Elements: Potential for new interactive elements or gestures directly from the lock screen.
      • Dynamic Wallpapers: Deeper integration with dynamic wallpapers and themes.
    1. QuickStar (Customize Your Quick Panel and Status Bar)

    QuickStar focuses on transforming your Quick Panel (the notification shade) and the status bar.

    • How to Use: Open Good Lock, tap QuickStar. Toggle it on.
    • Key Features:
      • Status Bar Icons: Hide or show specific icons in the status bar (e.g., alarm, NFC, Wi-Fi, battery percentage). This is great for decluttering.
      • Quick Panel Theming: Change the colors and transparency of the quick panel elements. While Theme Park handles overall themes, QuickStar offers finer control over the quick panel’s look.
      • Button Grid Customization: Adjust the layout and spacing of quick settings toggles, making them wider or narrower to fit more icons.
      • Separate Panels: On One UI 7, you can merge or separate the notification and Quick Panel pages, and QuickStar can help refine this experience.
    1. Theme Park (Create Your Own Custom Themes)

    Theme Park is a powerful tool to create full-fledged custom themes based on your wallpaper or chosen colors, applying them across the entire UI.

    • How to Use: Open Good Lock, tap Theme Park.
    • Key Features:
      • Wallpaper-Based Themes: Theme Park can automatically extract colors from your chosen wallpaper and suggest a matching color palette for your theme.
      • Manual Color Selection: Precisely select primary and accent colors for every UI element, including the Quick Panel, volume panel, keyboard, and app icons.
      • Icon Pack Creation: Create custom icon packs based on your theme’s colors.
      • Keyboard Customization: Design unique keyboard themes with custom colors for keys, background, and effects (integrates with Keys Cafe).
      • Dark Mode Support: Create separate light and dark mode versions of your custom theme.
    1. Sound Assistant (Advanced Audio Control)

    Sound Assistant provides granular control over your phone’s audio, going beyond standard volume settings.

    • How to Use: Open Good Lock, tap Sound Assistant. Toggle it on.
    • Key Features:
      • Individual App Volumes: Set different volume levels for individual apps, so one app isn’t too loud or quiet compared to others.
      • Custom Volume Panel: Change the layout and color of the volume panel that appears when you press the volume keys.
      • Simultaneous App Audio: Allows multiple apps to play sound at the same time (e.g., navigation audio over background music).
      • Detailed Volume Control: More precise volume increments (150 levels).
      • Scenarios: Set specific sound profiles for different situations.
    1. One Hand Operation+ (Advanced Gesture Controls)

    One Hand Operation+ is a game-changer for large-screen phones, adding customizable gesture handles for one-handed use.

    • How to Use: Open Good Lock, tap One Hand Operation+. Toggle it on.
    • Key Features:
      • Custom Gesture Handles: Add customizable transparent handles to the left or right edges of your screen.
      • Swipe Actions: Assign various actions to short swipe, long swipe, and diagonal swipe gestures (e.g., Back, Home, Recent Apps, Screenshot, Notification Panel, Flashlight, Open App, etc.).
      • Sensitivity Adjustment: Fine-tune the sensitivity and size of the gesture handles.
      • Smart Gestures: One UI 8 updates are bringing even smarter gestures for in-app controls.
    1. Home Up (Customize Home Screen, Apps Screen, and Folders)

    Home Up allows for extensive customization of your launcher (Home screen and Apps screen).

    • How to Use: Open Good Lock, tap Home Up. Toggle it on.
    • Key Features (2025 updates include “DIY Homescreen” for extreme control):
      • DIY Homescreen: Potentially revolutionary feature allowing for unprecedented control over icon placement and layout on your home screen.
      • Apps Screen Grid: Adjust the grid size of your Apps screen (e.g., 5×6, 6×6).
      • Folder Customization: Change folder layout, background blur, and pop-up styles.
      • Recent Apps Layout: Alter the style of the Recent Apps screen (e.g., vertical list, grid view).
      • Share Menu Customization: Edit and reorder options in the Android “Share via” menu.
    1. NavStar (Customize Navigation Bar)

    NavStar offers ways to personalize your traditional navigation bar or swipe gestures.

    • How to Use: Open Good Lock, tap NavStar. Toggle it on.
    • Key Features:
      • Button Customization: Change the icons, colors, and layout of the traditional navigation buttons (Back, Home, Recent).
      • Add Extra Buttons: Add useful extra buttons to the navigation bar.
      • Gesture Handle Customization: If using swipe gestures, customize the appearance (color, transparency, length) of the gesture hint bar at the bottom.
      • Hide Navigation Bar: Option to easily hide the navigation bar for full-screen immersion.

    Other Notable Good Lock Modules (2025 Overview):

    • Keys Cafe: Deeply customize your Samsung Keyboard with custom layouts, colors, effects, and sounds. Even create your own sticker sets!
    • Pentastic: For S Pen-enabled devices, customize the Air Command menu, pointer, and S Pen sound effects.
    • Wonderland: Create dynamic and animated wallpapers that react to your device’s movement.
    • Nice Shot: Enhance screenshot and screen recording functionalities (e.g., delete button on toolbar, prevent clipboard copy).
    • RegiStar: Customize the order of menu items within the main Settings app, add Back-Tap gestures, or reconfigure the side key.
    • Camera Assistant: Unlock advanced camera controls and settings not available in the default camera app (e.g., auto lens switching, faster shutter).
    • DropShip & Galaxy to Share: (Regional availability may vary) These modules focus on simplified file sharing between Galaxy devices.
    • Routines+: Adds more advanced conditions and actions to Samsung’s Modes and Routines (e.g., S Pen actions, fingerprint unlock conditions, text reader).
    • Good Guardians: A suite of utilities focusing on battery optimization, memory management, and thermal control (formerly Galaxy Labs).

    Step 4: Applying and Managing Your Customizations

    After configuring a module, its changes are usually applied immediately.

    1. Toggle On/Off: Most modules have a master toggle within the Good Lock app. You can quickly enable or disable a module’s effects.
    2. Experiment: Don’t be afraid to experiment with different settings. You can always revert to default settings within each module if you don’t like a change.
    3. Updates: Good Lock and its modules receive regular updates, often coinciding with One UI updates (like One UI 7 and 8). Check the Galaxy Store and Google Play Store for module updates to ensure compatibility and new features.

    Conclusion

    Samsung’s Good Lock 2025 is an indispensable tool for any Samsung Galaxy user looking to personalize their device beyond the factory settings. With its enhanced global availability and continuous development of powerful modules like LockStar, QuickStar, Theme Park, and Home Up, you have an unprecedented level of control over your One UI experience. By exploring and utilizing these built-in customization options, you can truly make your Samsung phone reflect your unique style and workflow, transforming it into a device that feels perfectly tailored to you.

    FAQ Section

    Q1: What is Samsung Good Lock 2025 and how is it different from previous versions?

    Samsung Good Lock 2025 is the latest iteration of Samsung’s official customization suite for Galaxy devices. The major difference in 2025 is its expanded availability globally via both the Google Play Store and the Galaxy Store, making it much easier for users worldwide to access. It also brings updated modules with new features and a redesigned main Good Lock app UI.

    Q2: Do I need to root my Samsung Galaxy phone to use Good Lock?

    No, you do not need to root your Samsung Galaxy phone to use Good Lock. Good Lock is an official Samsung application, designed to work within the standard Android framework and One UI, providing deep customization without compromising device security or warranty.

    Q3: Which One UI version is Good Lock 2025 compatible with?

    Good Lock 2025 is designed to be fully compatible with One UI 7 and is expected to be continuously updated to support upcoming versions like One UI 8. Ensure your phone is running a compatible One UI version for optimal performance and access to all module features.

    Q4: Can Good Lock modules drain my battery significantly?

    Most Good Lock modules are optimized to have a minimal impact on battery life. However, certain features that involve constant animations (like some Wonderland effects) or extensive background processing might use slightly more power. If you notice unusual battery drain, you can try disabling individual modules to identify the culprit.

    Q5: Where can I find new features and updates for Good Lock modules?

    You can find new features and updates for Good Lock and its individual modules directly within the Good Lock app itself (it will indicate available updates) or by checking the Galaxy Store and Google Play Store. Samsung regularly updates these modules, especially after major One UI version releases, to ensure compatibility and introduce new customization options.

  • How to Disable Bixby on Your Samsung Galaxy Phone

    How to Disable Bixby on Your Samsung Galaxy Phone

    Bixby is Samsung’s virtual assistant, designed to help users control their Galaxy devices with voice commands, interact with apps, and get personalized information. Introduced in 2017 with the Galaxy S8, Bixby aims to provide a more intuitive and integrated experience across Samsung’s ecosystem. While some users find Bixby incredibly helpful for setting routines, making calls, or controlling smart home devices, many others prefer to use Google Assistant or simply want to reclaim the functionality of their phone’s buttons without accidental Bixby activations.

    The good news is that while you can’t entirely uninstall Bixby from your Samsung Galaxy phone (as it’s deeply integrated into the One UI operating system), you can significantly disable its various components and even remap the Side key (formerly known as the Power or Bixby button on older models) to prevent accidental launches or assign it to a different function. This guide will walk you through the various methods to effectively disable or customize Bixby to your preference.

    Understanding Bixby’s Components

    Bixby isn’t just one single feature; it’s a suite of interconnected services:

    • Bixby Voice: The voice-activated assistant you interact with by saying “Hi Bixby” or holding down the Side key. It handles voice commands for tasks, apps, and settings.
    • Bixby Home (or Samsung Daily/Samsung Free): A customizable screen to the left of your main Home screen that displays information cards, news, and personalized content. On newer devices, this has evolved into “Samsung Free” or “Google Discover.”
    • Bixby Routines: An automation feature that uses machine learning to perform actions based on your usage patterns, location, or time (e.g., automatically turn on Wi-Fi when you get home). While Bixby-branded, it often functions somewhat independently and is usually considered a useful feature by many users.
    • Bixby Vision: An augmented reality feature that uses your camera to identify objects, translate text, find products, or scan QR codes.

    Our focus here will be on disabling or remapping Bixby Voice and Bixby Home, which are often the main sources of user frustration.

    How to Disable Bixby Voice and Remap the Side Key

    On newer Samsung Galaxy phones (running Android 9.0 Pie and newer, with One UI), the dedicated Bixby button has been merged with the Power button, now called the Side key. This means you’ll typically long-press the Side key to activate Bixby Voice by default. This is often the most annoying aspect for users.

    Step 1: Access Side Key Settings

    1. Open Settings: Swipe down from the top of your screen to open the Quick Settings panel, then tap the gear icon (⚙) to open Settings.
    2. Go to Advanced Features: Scroll down and tap on Advanced features.
    3. Select Side Key: Tap on Side key (or “Bixby key” on older models with a dedicated button).

    Step 2: Remap “Press and hold” for the Side Key

    1. Under the “Press and hold” section, you will typically see “Wake Bixby” selected by default.
    2. Tap Power off menu.
      • Now, when you press and hold the Side key, it will bring up the power options (Power off, Restart, Emergency mode) instead of launching Bixby Voice. This is often the primary goal for users who want to “disable” Bixby.

    Step 3: Customize “Double press” (Optional)

    You can also customize what happens when you double-press the Side key. By default, it might be set to quickly launch the camera or open Bixby.

    1. Under the “Double press” section, you can choose:
      • Quick launch camera
      • Open app (tap the gear icon next to it to select any app on your phone)
      • Nothing (if you prefer no action)
      • Open Bixby (if you still want quick access to Bixby via double-press).

    This step effectively “disables” Bixby from its default activation on the Side key.

    How to Turn Off Bixby Voice Wake-Up (“Hi Bixby”)

    Even after remapping the Side key, Bixby Voice might still respond if you say “Hi Bixby.” To turn off this voice activation:

    1. Launch Bixby Voice: Press and hold the Side key briefly to launch Bixby Voice, or open the Bixby Voice app from your app drawer. You might need to go through the initial Bixby setup if you’ve never used it before.
    2. Access Bixby Settings:
      • From the Bixby Voice screen, tap the compass icon (🧭) at the bottom.
      • Then, tap the gear icon (⚙) at the top right (or three vertical dots and then Settings).
    3. Disable Voice Wake-Up:
      • In Bixby Voice settings, find and tap on Voice wake-up.
      • Toggle the switch Off.
      • You can also disable “Use while phone is locked” and “Use for calls” if those options are present.

    This will stop Bixby from activating when you say “Hi Bixby.”

    How to Disable Bixby Home (or Samsung Free/Samsung Daily)

    Bixby Home (now often rebranded) is the customizable card-based screen that sits to the far left of your main Home screen. If you don’t use it, you can disable it.

    1. Access Home Screen Settings:
      • Pinch in on your Home screen with two fingers, or long-press on an empty space on your Home screen.
      • This will bring up the Home screen editing options (Wallpapers and style, Widgets, Settings).
    2. Swipe to the Left Panel: Swipe right (towards the far-left screen) until you see the Bixby Home/Samsung Free/Google Discover panel.
    3. Disable the Panel:
      • At the top of this panel, you will usually find a toggle switch. Tap it to turn it Off.
      • On some newer devices with One UI 3.1+, you might have the option to switch between Samsung Free and Google Discover. If you want neither, select “None” or ensure the toggle is off.

    This will remove the Bixby Home/Samsung Free/Google Discover panel from your Home screen carousel.

    How to Clear Bixby Data (Reset Bixby)

    If you’ve used Bixby in the past and want to clear all its learned data and settings, you can reset it. This can also help if Bixby is behaving erratically.

    1. Open Settings: Go to Settings (⚙).
    2. Go to Apps: Tap on Apps.
    3. Find Bixby Voice: Scroll down or use the search bar to find and select Bixby Voice.
    4. Clear Data:
      • Tap on Storage.
      • Tap Clear cache.
      • Then, tap Clear data and confirm by tapping Delete.
    5. Disable (Optional): After clearing data, you might see a “Disable” button on the Bixby Voice app info page. Tapping this might prevent Bixby Voice from launching the initial setup screen if you accidentally press the Side key in the future, effectively silencing it further without remapping.

    Note: Clearing data will revert Bixby Voice to its initial setup state. If you decide to use it again, you’ll have to go through the setup process.

    Disabling Bixby Routines (if desired)

    Bixby Routines is a powerful automation feature that many users find useful. If you wish to disable specific routines or the feature entirely:

    1. Open Settings: Go to Settings (⚙).
    2. Go to Advanced Features: Tap on Advanced features.
    3. Select Bixby Routines: Tap on Bixby Routines.
    4. Manage Routines:
      • To disable a single routine: Go to the “My routines” tab and toggle off the switch next to the routine you want to deactivate.
      • To completely disable Bixby Routines: There’s usually a main toggle switch at the top of the “Bixby Routines” screen that you can turn Off.

    Alternative: Using Google Assistant

    Many users prefer Google Assistant over Bixby. You can set Google Assistant as your default digital assistant.

    1. Open Settings: Go to Settings (⚙).
    2. Go to Apps: Tap on Apps.
    3. Choose Default Apps: Tap on Choose default apps (or “Default apps”).
    4. Digital Assistant App: Tap on Digital assistant app (or “Assistant app”).
    5. Select Google: Choose Google as your default assistant.

    Now, holding down the Home button (if you use navigation buttons) or saying “Hey Google” (if enabled) will activate Google Assistant.

    Why Can’t I Completely Uninstall Bixby?

    Bixby is deeply embedded into Samsung’s One UI Android overlay and its core services. Unlike a regular app, it’s considered a system application. Removing it entirely could potentially destabilize system functions or lead to unexpected behavior. Samsung integrates Bixby into various aspects of the phone’s functionality, making full uninstallation impractical without significant modifications (like rooting), which can void your warranty and pose security risks. The methods outlined above are the official and safest ways to manage its presence on your device.

    By following these steps, you can effectively manage Bixby’s presence on your Samsung Galaxy phone, reassigning buttons and silencing voice commands to better suit your preferences and usage habits.

    FAQ (Frequently Asked Questions)

    Q1: Can I completely uninstall Bixby from my Samsung Galaxy phone?

    A1: No, you cannot completely uninstall Bixby from your Samsung Galaxy phone without rooting your device. Bixby is deeply integrated into Samsung’s One UI operating system as a system app. However, you can significantly disable its various features and remap its activation button, effectively making it dormant.

    Q2: How do I stop Bixby from activating when I press and hold the Side key (Power button)?

    Go to Settings > Advanced features > Side key. Under “Press and hold,” select Power off menu instead of “Wake Bixby.” This will make the Side key bring up the power options instead of Bixby Voice.

    Q3: How do I prevent Bixby from waking up when I say “Hi Bixby”?

    A3: To turn off the voice wake-up feature, you need to:

    1. Launch Bixby Voice (e.g., by briefly holding the Side key).
    2. Tap the compass icon (🧭) at the bottom, then the gear icon (⚙) for settings.
    3. Go to Voice wake-up and toggle the switch Off.

    Q4: What happened to Bixby Home? Why do I see Samsung Free or Google Discover instead?

    Samsung has evolved the Bixby Home screen. On newer devices, it has been replaced by Samsung Free or you’ll have the option to choose Google Discover as the left-most Home screen panel. You can disable this panel by pinching in on your Home screen, swiping to the far-left panel, and toggling its switch off.

    Q5: Can I remap the Side key to open Google Assistant instead of Bixby?

    While you can remap the “Double press” action of the Side key to open any app (including the Google app, which then launches Google Assistant), you generally cannot directly assign Google Assistant to the “Press and hold” action. The “Press and hold” option is usually limited to “Wake Bixby” or “Power off menu.” You can still set Google Assistant as your default digital assistant in Settings > Apps > Choose default apps > Digital assistant app.

    Q6: Will disabling Bixby affect other functions on my Samsung phone?

    Disabling Bixby Voice, remapping the Side key, or turning off Bixby Home will generally not negatively impact other essential functions of your Samsung phone. Features like Bixby Vision and Bixby Routines are somewhat independent and can be used or disabled separately based on your preference.

    Q7: I have an older Samsung phone with a dedicated Bixby button. How do I disable it?

    On older Samsung phones with a physical, dedicated Bixby button (like the Galaxy S8, S9, Note 8, Note 9):

    1. Press the Bixby button to open Bixby Home.
    2. Tap the gear icon (⚙) at the top (or three dots for settings).
    3. Look for “Bixby key” or “Bixby button settings.”
    4. You might have options to change it from a single press to a double press for Bixby, or to set “Do nothing” for the single press, forcing a double press for Bixby activation. Some older models allowed for full remapping via third-party apps, but official support is limited to changing activation methods.

    Q8: What are Bixby Routines, and should I disable them?

    Bixby Routines (now often called Modes and Routines) is a smart automation feature that learns your habits or allows you to set up custom rules (e.g., “If I arrive home, then turn on Wi-Fi and set volume to loud”). Many users find these routines highly useful for optimizing their phone’s behavior. You only need to disable them if you don’t use them or prefer manual control. They are generally considered a beneficial feature by most users.

  • How to Connect Samsung Phone to TV via Smart View

    How to Connect Samsung Phone to TV via Smart View

    Want to share your holiday photos, stream a video, or display a presentation from your Samsung phone on a bigger screen? Connecting your phone to your TV is a seamless way to do this, and for Samsung users, Smart View is the go-to feature. Smart View is Samsung’s built-in screen mirroring technology, allowing you to wirelessly cast what’s on your phone’s display directly onto your Smart TV or any other Miracast-compatible display.

    What You Need Before You Start

    • Samsung Phone: Most Galaxy models running Android 4.2 or later will support Smart View.
    • Smart TV: Preferably a Samsung Smart TV (2012+), but any Miracast-enabled display works.
    • Same Wi-Fi Network: Both your phone and TV need to be connected to the same network.
    • Correct TV Input: If using a dongle (e.g., Miracast, Fire Stick), make sure the TV is set to the right HDMI input.

    How to Use Smart View: Step-by-Step

    1. Prepare the TV:
      • Power it on and ensure it’s connected to the same Wi-Fi as your phone.
      • If not a Samsung TV, look for “Screen Mirroring,” “Wireless Display,” or similar options.
    2. Open Smart View on Your Phone:
      • Swipe down twice from the top of your screen to access Quick Settings.
      • Tap the Smart View icon (rectangle with arrows).
      • If it’s not there, swipe left or tap the three dots to edit/add it.
    3. Select Your TV:
      • A list of compatible devices will appear.
      • Tap your TV’s name.
    4. Approve on the TV (First Time):
      • Accept the connection prompt using your TV remote.
      • You may need to enter a PIN shown on your TV screen.
    5. Begin Mirroring:
      • Your phone’s screen now appears on your TV.
      • Use the on-screen toolbar to disconnect, pause, or adjust settings.

    Enhancing Your Smart View Experience

    • Rotate Your Phone: Landscape mode gives the best view for videos and photos.
    • Use as Remote: On some Samsung TVs, your phone can double as a remote.
    • Hide Phone Screen: If supported, turn off your phone’s screen to save battery while mirroring.
    • Aspect Ratio: Tap the Smart View toolbar and adjust to 16:9 or full screen for best fit.

    Troubleshooting Tips

    • Wi-Fi Check: Make sure both devices are on the same band (2.4GHz or 5GHz).
    • Restart Devices: A reboot can fix unexpected issues.
    • Update Software:
      • On Phone: Settings > Software update > Download and install.
      • On TV: Settings > Support > Software Update.
    • Input Issues: Double-check your TV is on the correct HDMI or wireless display source.
    • Disable VPN: VPNs can block local connections.
    • Clear SmartThings CacheSettings > Apps > SmartThings > Storage > Clear cache.
    • Stay Close: Keep the phone and TV within good range of the router.

    Frequently Asked Questions (FAQ)

    Q1: How is Smart View different from Chromecast? Smart View mirrors your entire screen via Miracast. Chromecast casts specific content from apps like YouTube and Netflix.

    Q2: Can I use Smart View on a non-Samsung TV? Yes, as long as it supports Miracast or you use a compatible dongle like Roku or Fire TV.

    Q3: Why does it lag or disconnect? It’s often Wi-Fi related. Try using a 5GHz band, moving closer to the router, or minimizing other network activity.

    Q4: Can I use other apps while mirroring? Yes, but your actions will show up on the TV. Some phones allow multi-window or screen-off modes.

    Q5: Do I need internet? No, Smart View uses local Wi-Fi or Wi-Fi Direct. But you need internet to stream online content from your phone.

    With Smart View, you can ditch the cables and beam your phone to the big screen in seconds. Whether you’re showing off vacation photos, streaming a movie, or sharing slides, it’s a feature worth mastering.

  • How to Check if Samsung Phone is Hacked or Monitored

    How to Check if Samsung Phone is Hacked or Monitored

    In an age where our smartphones are central to our digital lives, the thought of a Samsung phone being hacked or monitored is unsettling. A hacked phone means an unauthorized party has gained access to your device, potentially stealing personal data, spying on your communications, or using your phone for malicious activities. Monitoring, often a component of hacking, refers to the unauthorized surveillance of your calls, messages, location, and app usage.

    The methods hackers use are constantly evolving, ranging from sophisticated phishing attacks and malware to exploiting software vulnerabilities or even physical access to your device. Common types of malicious software that facilitate monitoring include spyware and adware, designed to collect information or bombard you with unwanted ads, respectively.

    The history of mobile phone security has been a constant cat-and-mouse game. From early viruses on Symbian OS in the 2000s to sophisticated state-sponsored spyware like Pegasus in recent years, threats have grown in complexity. Android, being an open-source platform, has seen its share of vulnerabilities, though Google and manufacturers like Samsung regularly release security updates to patch these. Maintaining vigilance and understanding the signs are crucial for protecting your digital privacy.

    How to Check if Your Samsung Phone is Hacked or Monitored

    While a definitive confirmation often requires forensic analysis, several warning signs and diagnostic steps can help you determine if your Samsung phone might be compromised.

    Step 1: Look for Unusual Performance and Battery Drain

    One of the most common indicators of a hacked or monitored phone is a noticeable change in its performance. Malicious software running in the background consumes resources.

    • Rapid Battery Drain: If your phone’s battery is depleting much faster than usual, even with minimal use, it could be a sign of hidden processes.
      • How to Check: Go to Settings > Battery and device care > Battery. Tap on “View details” or “Battery usage” to see a breakdown of which apps are consuming the most power. Look for unfamiliar apps or unusually high consumption from legitimate apps when you haven’t been using them extensively.
    • Overheating: A phone that feels unusually hot to the touch even when not in heavy use or charging could indicate malicious activity.
    • Slow Performance: Frequent lagging, freezing, or apps crashing more often than usual can be a symptom.
      • How to Check: Monitor your phone’s general responsiveness. If opening apps, navigating menus, or Browse feels sluggish consistently, it’s a red flag.

    Step 2: Monitor Unusual Data Usage

    Spyware and malware often communicate with remote servers to send collected data, leading to unexpected spikes in data consumption.

    • Unexplained Data Spikes: If your mobile data usage suddenly increases significantly without a change in your usage habits.
      • How to Check: Go to Settings > Connections > Data usage. Review your cellular data usage for the current billing cycle. Note any apps consuming unusually large amounts of data, especially those you rarely use or don’t recognize. Look for significant spikes in daily or weekly usage that don’t align with your activity.

    Step 3: Inspect for Suspicious Apps and Activity

    Hackers might install apps or manipulate existing settings to maintain access.

    • Unrecognized Apps: Look for any apps on your phone that you don’t remember installing. Malicious apps often try to mimic legitimate ones or have generic, suspicious names.
      • How to Check: Go to Settings > Apps. Scroll through the entire list of installed applications. If you find anything suspicious, do not open it. Instead, proceed to uninstall it.
    • Unusual Settings Changes: If your phone’s settings (e.g., ringtones, wallpaper, browser homepage) change without your intervention.
    • Pop-up Ads: Excessive and intrusive pop-up ads, especially when not Browse the internet, could indicate adware.
    • Suspicious Outgoing Calls/Texts: Check your call history and messaging app for outgoing calls or texts you didn’t make. Some malware sends premium SMS messages.
      • How to Check: Open your Phone app and check Recents or Call history. Open your Messages app and review your sent messages.
    • Camera/Microphone Indicators: Modern Android versions (including MIUI) often show indicators when the camera or microphone are in active use. If you see these indicators when you’re not actively using an app that requires them, it’s a major red flag.

    Step 4: Check Call Forwarding (USSD Codes)

    Some older hacking methods or parental monitoring tools might involve diverting calls or messages. While not definitive proof of a hack, these codes can reveal if your calls are being redirected.

    • Dial *#21#: This code checks if unconditional call forwarding (all calls) is enabled. It will show the number to which calls are being forwarded.
    • Dial *#67#: Checks for conditional call forwarding (calls diverted when busy, unanswered, or unreachable).
    • Dial *#62#: Checks if calls are being redirected when your phone is turned off or out of signal.
    • Dial *#002#: This is a universal code to disable all call forwarding.
      • Action: Open your phone’s Dialer app and enter these codes. Pay attention to any numbers listed other than your carrier’s voicemail number. If you see unfamiliar numbers, especially after *#21#, it’s a serious concern.

    Step 5: Run a Security Scan

    Samsung phones often come with built-in security features, and you can also use reputable third-party antivirus apps.

    • Samsung’s Device Protection (McAfee integration):
      • How to Check: Go to Settings > Battery and device care > Device protection. Tap “Scan phone” (or “Scan device”). This feature, often powered by McAfee, scans for malware and suspicious activity.
    • Google Play Protect: This is built into the Google Play Store and constantly scans apps for harmful behavior.
      • How to Check: Open the Google Play Store app. Tap your profile icon (top-right). Tap “Play Protect.” Here you can see recent scans and initiate a new one. Ensure “Scan apps with Play Protect” is turned on in Play Protect settings.
    • Third-Party Antivirus (Optional): If you suspect a deeper infection, consider installing a reputable antivirus app like Malwarebytes, Avast, or Bitdefender from the Google Play Store. Run a full system scan.

    Step 6: Review Device Administrator Apps and Permissions

    Malicious apps might try to gain administrator privileges to prevent uninstallation or maintain control.

    • Device Administrator Apps:
      • How to Check: Go to Settings > Security and privacy > More security settings > Device admin apps (or “Device administrators”).
      • Action: Review the list. If you see any suspicious or unfamiliar apps with administrative access, deactivate their administrative rights first, then proceed to uninstall them from the Apps list.
    • App Permissions: Review the permissions granted to your apps. An innocent-looking game app shouldn’t need access to your microphone, camera, or SMS messages.
      • How to Check: Go to Settings > Apps > Permission manager. Go through categories like “Microphone,” “Camera,” “SMS,” “Location” and review which apps have access. Revoke permissions for any app that doesn’t genuinely need them.

    Step 7: Check for Unknown Devices in Your Samsung Account

    If your Samsung account itself has been compromised, hackers could be accessing your data through other devices.

    • How to Check:
      • On your phone: Go to Settings > Accounts and backup > Manage accounts. Tap on your Samsung account. Look for “Devices” or “Security and privacy” to review connected devices and recent activity.
      • On the web: Go to the official Samsung Account website (account.samsung.com), log in, and check “Security” or “Devices” to see recent activity and connected devices.
    • Action: If you see unrecognized devices or suspicious login attempts, immediately change your Samsung account password and enable Two-Step Verification if you haven’t already.

    Step 8: Factory Reset (Last Resort)

    If all troubleshooting steps fail and you still strongly suspect your phone is compromised, a factory reset is the most drastic but often most effective solution.

    • WARNING: A factory reset will erase ALL data on your phone, including photos, videos, apps, contacts, and settings. Back up all essential data to a cloud service or a computer BEFORE proceeding.
    • How to Perform:
      1. Go to Settings > General management > Reset > Factory data reset.
      2. Follow the on-screen instructions, confirming your choice.
      • Action: After the reset, set up your phone as new. Do not restore from a backup immediately, as the backup might contain the malicious software. Instead, selectively reinstall apps and monitor your phone’s behavior.

    General Security Best Practices to Prevent Hacking and Monitoring

    • Keep Software Updated: Regularly install system updates (Android and Samsung’s One UI/MIUI) and app updates. These updates often include critical security patches.
    • Download Apps Only from Reputable Sources: Stick to the Google Play Store and Samsung Galaxy Store. Avoid downloading apps from unknown websites or third-party app stores.
    • Use Strong, Unique Passwords and Biometrics: Secure your phone with a strong PIN, pattern, or alphanumeric password. Enable fingerprint or facial recognition.
    • Enable Two-Factor Authentication (2FA): Use 2FA for all your important online accounts (Google, Samsung, banking, social media).
    • Be Wary of Suspicious Links and Emails: Do not click on suspicious links in texts, emails, or pop-up ads. Verify the sender before interacting.
    • Disable Unused Connectivity: Turn off Wi-Fi, Bluetooth, and Location Services when not in use to reduce potential attack vectors.
    • Review App Permissions: Be mindful of the permissions you grant to apps. Grant only necessary permissions.
    • Avoid Public Wi-Fi for Sensitive Transactions: Public Wi-Fi networks are often unsecured. Use a Virtual Private Network (VPN) for added security if you must use them for sensitive activities.
    • Use Secure Folder (Samsung Specific): For highly sensitive apps and files, utilize Samsung’s Secure Folder feature, which creates an encrypted, separate space on your phone.

    Frequently Asked Questions (FAQ)

    Q1: Can my Samsung phone be hacked just by clicking a link?

    Yes, it’s possible. Clicking on malicious links can lead to phishing websites that steal your credentials or initiate drive-by downloads of malware onto your device. Always be cautious about links from unknown sources.

    Q2: Will a factory reset remove all spyware from my Samsung phone?

    A factory reset is highly effective in removing most spyware and malware because it wipes all data and settings, restoring the phone to its original state. However, extremely rare and sophisticated rootkits might persist, but for the vast majority of users, a factory reset is a reliable solution.

    Q3: Does Samsung Knox protect against hacking?

    Samsung Knox is a robust security platform built into Samsung Galaxy devices, providing multi-layered hardware and software protection. While it significantly enhances security and makes hacking much harder, no system is 100% impenetrable. Knox aims to protect against unauthorized access and data manipulation from the moment your phone boots up.

    Q4: How often should I scan my Samsung phone for malware?

    Google Play Protect scans apps continuously, and Samsung’s Device Protection can be run manually. It’s a good practice to run a manual scan with Device Protection (Settings > Battery and device care > Device protection > Scan phone) once a week or whenever you notice suspicious behavior.

    Q5: Can someone hack my phone without me downloading anything?

    Yes, though it’s less common for average users. Sophisticated “zero-click” exploits can allow hackers to compromise a device without any user interaction, but these are typically reserved for high-value targets by state-sponsored actors. More commonly, hacking relies on social engineering (tricking you into clicking a link or downloading something) or exploiting unpatched vulnerabilities.

    Q6: What should I do immediately if I confirm my phone is hacked?

    1. Disconnect from networks: Turn off Wi-Fi and mobile data to stop data transmission.
    2. Change all critical passwords: Use a different, secure device (computer) to change passwords for your email, banking, social media, and other important accounts.
    3. Notify contacts: Warn friends and family if you suspect your accounts might have been used to send malicious messages.
    4. Perform a factory reset (if necessary): After backing up essential, clean data.
    5. Report the incident: Contact your mobile carrier and, if applicable, law enforcement.