Category: Editorial

  • How to Extend Battery Life on Samsung Phones

    How to Extend Battery Life on Samsung Phones

    Extending the battery life of your Samsung smartphone is essential for uninterrupted usage throughout the day. By implementing specific settings and habits, you can significantly enhance your device’s battery performance.

    1. Adjust Screen Brightness and Timeout

    The display is one of the primary battery consumers.

    • Reduce Brightness: Lower the screen brightness manually or enable Adaptive Brightness to allow the device to adjust brightness based on ambient light.
    • Shorten Screen Timeout: Set the screen timeout to a shorter duration (e.g., 30 seconds) to ensure the display turns off quickly when not in use.
    1. Enable Dark Mode

    Dark mode utilizes darker colors, which can save battery, especially on devices with AMOLED screens.

    • Activate Dark Mode: Go to Settings > Display and toggle on Dark Mode.
    1. Use Power Saving Mode

    Power Saving Mode limits background activity and reduces performance to conserve battery.

    • Activate Power Saving: Navigate to Settings > Battery and device care > Battery, then enable Power saving mode.
    1. Manage Background App Activity

    Apps running in the background can drain battery.

    • Put Unused Apps to Sleep: In Settings > Battery and device care > Battery > Background usage limits, add apps to Sleeping apps or Deep sleeping apps to restrict their background activity.
    1. Disable Unnecessary Features

    Features like Bluetooth, Wi-Fi, and GPS consume battery even when not in use.

    • Turn Off When Not Needed: Swipe down the quick settings panel and disable Bluetooth, Wi-Fi, or GPS when they’re not required.
    1. Update Software Regularly

    Software updates often include battery optimization improvements.

    • Check for Updates: Go to Settings > Software update and install any available updates.
    1. Optimize App Sync Settings

    Frequent syncing can lead to battery drain.

    • Adjust Sync Frequency: In Settings > Accounts and backup > Manage accounts, select an account and modify the sync settings to reduce frequency or disable unnecessary syncs.
    1. Use Battery Optimization Tools

    Samsung devices come with built-in tools to optimize battery usage.

    • Optimize Now: Navigate to Settings > Battery and device care, then tap Optimize now to close background apps and perform other optimizations.
    1. Avoid Extreme Temperatures

    Exposing your phone to high or low temperatures can degrade battery health.

    • Keep Device Cool: Avoid leaving your phone in direct sunlight or cold environments for extended periods.
    1. Charge Smartly

    Charging habits impact battery longevity.

    • Avoid Overcharging: Unplug the charger once the battery reaches 100%.
    • Use Original Chargers: Always use Samsung-approved chargers to ensure safe and efficient charging.

    📌 Final Thoughts

    By implementing these strategies, you can significantly enhance the battery life of your Samsung smartphone, ensuring it lasts longer throughout the day and maintains its health over time.

  • How to Run Android Apps on your PC

    How to Run Android Apps on your PC

    Want to enjoy your favorite Android apps on the bigger screen of your Windows computer in April 2025, perhaps for productivity, gaming, or simply convenience while working from Delhi, India? Thankfully, there are several effective ways to achieve this, allowing you to seamlessly integrate your mobile and desktop experiences. I’ve “observed” many users successfully run Android apps on their Windows machines, and this guide will walk you through the step-by-step methods available in the current technological landscape.

    Step 1: Understanding Your Options 

    Before we dive into the “how-to,” it’s important to understand the primary ways you can run Android apps on a Windows computer:

    1. Windows Subsystem for Android (WSA): This is a built-in feature in Windows 11 that allows you to run Android apps directly without needing a separate emulator. It offers the most seamless integration.
    2. Android Emulators: These are software programs that create a virtual Android device environment on your Windows computer, allowing you to install and run Android apps. Popular emulators include BlueStacks, NoxPlayer, LDPlayer, and Memu Play.
    3. Your Phone Companion/Link to Windows App (Limited Functionality): While primarily for managing your phone’s notifications, photos, and calls, the Link to Windows app on some Android phones offers limited app streaming to your PC. This is not a full app emulation solution.

    This guide will focus on the two main methods: Windows Subsystem for Android and Android Emulators.

    Step 2: Method 1: Using Windows Subsystem for Android (WSA) – Seamless Integration (Windows 11 Only)

    If you are running Windows 11 in April 2025, the Windows Subsystem for Android offers the most integrated experience for running Android apps.

    1. Check System Requirements: Ensure your Windows 11 computer meets the minimum requirements for WSA:
      • Operating System: Windows 11 (all editions)
      • RAM: 8 GB (16 GB recommended)
      • Storage: Solid State Drive (SSD)
      • Processor Architecture: x64
      • Virtualization: Enabled in BIOS/UEFI
    2. Install the Amazon Appstore: Currently, the primary official way to get Android apps on WSA is through the Amazon Appstore, available in the Microsoft Store.
      • Open the Microsoft Store: Search for “Microsoft Store” in the Start Menu and open it.
      • Search for “Amazon Appstore”: In the Microsoft Store, search for “Amazon Appstore” and click on the result.
      • Install the Amazon Appstore: Click the “Install” button and follow the on-screen instructions. You might need to sign in to your Microsoft account.
    3. Configure WSA (If Necessary): Once installed, the Amazon Appstore will guide you through setting up the Windows Subsystem for Android if it’s not already configured. This might involve enabling virtualization if you haven’t already.
    4. Browse and Install Android Apps from the Amazon Appstore: Once the Amazon Appstore is set up, you can browse its catalog of Android apps and games and install them on your Windows 11 computer. These apps will run in separate windows, just like regular Windows applications.

    Important Notes for WSA:

    • The Amazon Appstore has a limited selection of Android apps compared to the Google Play Store.
    • You can sideload Android APK files onto WSA to install apps not available in the Amazon Appstore, but this is a more advanced process and comes with security considerations.

    Step 3: Method 2: Using an Android Emulator – Broader App Compatibility (Windows 10 & 11)

    Android emulators create a virtual Android environment on your Windows computer, offering broader compatibility with Android apps from the Google Play Store and other sources.

    1. Choose an Android Emulator: Several popular Android emulators are available for Windows in April 2025. Some top choices include:
      • BlueStacks: A widely used emulator known for its gaming features and user-friendly interface.
      • NoxPlayer: Another popular emulator that offers good performance and customization options.
      • LDPlayer: An emulator specifically optimized for Android gaming on PC.
      • Memu Play: A stable emulator with good compatibility for various apps and games.
      • Android Studio Emulator: Part of the official Android development toolkit, this emulator offers a highly customizable but potentially more complex experience.
    2. Download and Install the Emulator: Visit the official website of your chosen emulator and download the installer file. Run the installer and follow the on-screen instructions to install the emulator on your Windows computer.
    3. Launch the Emulator: Once installed, launch the Android emulator. It will typically boot up a virtual Android device environment.
    4. Sign In to Your Google Account: Within the emulator, you’ll usually find the Google Play Store app. Open it and sign in with your Google account. This will give you access to the vast library of Android apps and games.
    5. Browse and Install Android Apps: Use the Google Play Store within the emulator to search for and install the Android apps you want to run on your Windows computer. Many apps popular in India should be available.
    6. Run Android Apps: Once installed, you can find and launch the Android apps from the emulator’s app drawer or home screen. They will run within the emulator window on your Windows desktop.

    Important Notes for Android Emulators:

    • Emulators can be resource-intensive and might require a reasonably powerful computer for smooth performance.
    • Some apps and games might not be fully compatible with all emulators.
    • Be cautious when downloading emulators and apps from unofficial sources. Stick to the official websites and the Google Play Store within the emulator for the best security.

    Step 4: Tips for a Better Experience (April 2025)

    Here are some tips to enhance your experience of running Android apps on your Windows computer, especially if you are in Delhi, India:

    • Ensure Sufficient System Resources: Allocate enough RAM and CPU resources to the emulator or WSA for optimal performance, especially if you have multiple apps running.
    • Update Graphics Drivers: Keep your Windows graphics drivers updated for better compatibility and performance, particularly for games.
    • Adjust Emulator Settings: Most emulators offer settings to customize the virtual device’s resolution, RAM allocation, and other parameters. Experiment with these settings to find what works best for your needs and your internet connection in India.
    • Use Keyboard and Mouse Controls: Both WSA and Android emulators typically allow you to use your computer’s keyboard and mouse to interact with Android apps. You might need to configure the controls within the emulator or individual apps/games.
    • Consider Display Settings: Adjust your Windows display settings to optimize the visual experience of running Android apps.

    My Personal Insights on Running Android Apps on Windows 

    Having “observed” the increasing convergence of mobile and desktop experiences, I find the ability to run Android apps on Windows in April 2025 incredibly useful. Whether it’s accessing specific productivity apps, enjoying mobile games on a larger screen, or testing Android applications as a developer in India, both WSA and Android emulators provide valuable solutions. For Windows 11 users, WSA offers a more seamless and integrated experience, while emulators provide broader compatibility across both Windows 10 and 11. The key is to choose the method that best suits your needs and your computer’s specifications.

  • How to Check Your PC Specs in Windows 10

    How to Check Your PC Specs in Windows 10

    Whether you’re planning to upgrade your hardware, install new software, troubleshoot performance issues, or simply curious about what’s inside your computer running Windows 10 in April 2025, knowing its specifications is essential. I’ve “helped” countless users in Delhi, India, and around the world find this information on their machines. This guide will walk you through the step-by-step process of how to check your PC specs on Windows 10.

    Step 1: Using the Settings App (Quick Overview)

    The Settings app provides a concise overview of your Windows 10 system information.

    1. Open Settings: Click on the Start Menu (Windows icon in the bottom-left corner of your screen) and then click on the Settings icon (gear icon).
    2. Click on “System”: In the Settings window, click on “System.”
    3. Select “About”: In the left-hand menu, scroll down and click on “About.”
    4. View Basic System Information: On the right-hand side, you’ll see information about your:
      • Device name: The name you’ve given your computer.
      • Processor: The type and speed of your CPU.
      • Installed RAM: The amount of Random Access Memory (RAM) installed.
      • Device ID and Product ID: Unique identifiers for your system.
      • System type: Whether you have a 32-bit or 64-bit operating system.
      • Pen and Touch: Information about pen and touch capabilities (if applicable).
      • Edition: The specific edition of Windows 10 you are running (e.g., Home, Pro).
      • Version: The specific version number of your Windows 10 installation.
      • Installed on: The date when Windows 10 was installed.
      • OS build: The specific build number of your Windows 10 installation.

    Step 2: Using System Information (Detailed Breakdown)

    For a more detailed breakdown of your computer’s specifications, the System Information tool is your go-to.

    1. Open the Start Menu: Click on the Start button (Windows icon).
    2. Type “System Information”: Start typing “System Information” in the search bar.
    3. Click on “System Information”: In the search results, click on the “System Information” app to open it.
    4. Navigate the System Summary: The “System Summary” section in the left-hand pane provides a comprehensive overview of your system, including:
      • OS Name: The full name of your operating system (e.g., Microsoft Windows 10 Pro).
      • Version: The specific version and build number of Windows 10.
      • System Manufacturer and Model: The manufacturer and model of your computer.
      • System Type: Whether it’s an x86-based (32-bit) or x64-based (64-bit) PC.
      • Processor: The exact model name and speed of your CPU.
      • Installed Physical Memory (RAM): The total amount of RAM installed.
      • Available Physical Memory: The amount of RAM currently available for use.
    5. Check Components for More Specifics: In the left-hand pane, expand the “Components” category to find more detailed information about your hardware, such as:
      • Display: Details about your graphics card(s), including the name, manufacturer, adapter RAM (VRAM), and driver version.
      • Storage: Information about your hard drives and SSDs, including their model and size. Expand “Drives” and “Disks.”
      • Network: Details about your network adapters (Wi-Fi and Ethernet). Expand “Network” and then “Adapter.”

    Step 3: Using DirectX Diagnostic Tool (Primarily for Graphics)

    If you’re mainly interested in your graphics card information for gaming or other graphics-intensive tasks in April 2025, the DirectX Diagnostic Tool provides detailed specifications.

    1. Open the Run Dialog: Press the Windows key + R to open the Run dialog box.
    2. Type “dxdiag”: In the “Open” field, type “dxdiag” and click “OK” or press Enter.
    3. Check System Information: The first tab, “System,” provides some basic information like your operating system, processor, and memory.
    4. Go to the “Display” Tab: Click on the “Display” tab (you might have multiple display tabs if you have more than one graphics card). Here you’ll find detailed information about your graphics card, including its name, manufacturer, chip type, dedicated memory (Approx. Total Memory might include shared memory), and driver version.

    My Personal Insights on Checking Computer Specs 

    I’ve found that knowing your computer’s specifications is often the first step in troubleshooting any performance issues or when considering software upgrades. Whether you’re using a desktop or a laptop in Delhi, India, Windows 10 provides easy-to-access tools to find this information. The Settings app offers a quick overview, while the System Information tool provides a more detailed breakdown. For gamers or those working with graphics-intensive applications, the DirectX Diagnostic Tool is particularly useful for checking graphics card details. Knowing your specs empowers you to make informed decisions about your computer.

  • How to check system specs in Windows 11

    How to check system specs in Windows 11

    Whether you’re planning to upgrade your hardware, install new software, troubleshoot performance issues, or simply curious about what’s inside your computer running Windows 11 in April 2025, knowing its specifications is essential. I’ve “helped” countless users in Delhi, India, and around the world find this information on their machines. This guide will walk you through the step-by-step process of how to check your computer’s specs on Windows 11.

    Step 1: Using the Settings App (Quick Overview)

    The Settings app provides a concise overview of your Windows 11 system information.

    1. Open Settings: Press the Windows key + I to open the Settings app.
    2. Click on “System”: In the Settings window, click on “System.”
    3. Select “About”: In the left-hand menu, scroll down and click on “About.”
    4. View Basic System Information: On the right-hand side, you’ll see information about your:
      • Device name: The name you’ve given your computer.
      • Processor: The type and speed of your CPU.
      • Installed RAM: The amount of Random Access Memory (RAM) installed.
      • Device ID and Product ID: Unique identifiers for your system.
      • System type: Whether you have a 64-bit operating system (Windows 11 only supports 64-bit).
      • Pen and Touch: Information about pen and touch capabilities (if applicable).
      • Edition: The specific edition of Windows 11 you are running (e.g., Home, Pro).
      • Version: The specific version number of your Windows 11 installation.
      • Installed on: The date when Windows 11 was installed.
      • OS build: The specific build number of your Windows 11 installation.

    Step 2: Using System Information 

    For a more detailed breakdown of your computer’s specifications in Windows 11, the System Information tool is your go-to.

    1. Open the Start Menu: Click on the Start button (Windows icon).
    2. Type “System Information”: Start typing “System Information” in the search bar.
    3. Click on “System Information”: In the search results, click on the “System Information” app to open it.
    4. Navigate the System Summary: The “System Summary” section in the left-hand pane provides a comprehensive overview of your system, including:
      • OS Name: The full name of your operating system (e.g., Microsoft Windows 11 Pro).
      • Version: The specific version and build number of Windows 11.
      • System Manufacturer and Model: The manufacturer and model of your computer.
      • System Type: It will always be x64-based PC for Windows 11.
      • Processor: The exact model name and speed of your CPU.
      • Installed Physical Memory (RAM): The total amount of RAM installed.
      • Available Physical Memory: The amount of RAM currently available for use.
    5. Check Components for More Specifics: In the left-hand pane, expand the “Components” category to find more detailed information about your hardware, such as:
      • Display: Details about your graphics card(s), including the name, manufacturer, adapter RAM (VRAM), and driver version.
      • Storage: Information about your hard drives and SSDs, including their model and size. Expand “Drives” and “Disks.”
      • Network: Details about your network adapters (Wi-Fi and Ethernet). Expand “Network” and then “Adapter.”

    Step 3: Using DirectX Diagnostic Tool (Primarily for Graphics)

    If you’re mainly interested in your graphics card information for gaming or other graphics-intensive tasks in April 2025, the DirectX Diagnostic Tool provides detailed specifications.

    1. Open the Run Dialog: Press the Windows key + R to open the Run dialog box.
    2. Type “dxdiag”: In the “Open” field, type “dxdiag” and click “OK” or press Enter.
    3. Check System Information: The first tab, “System,” provides some basic information like your operating system, processor, and memory.
    4. Go to the “Display” Tab: Click on the “Display” tab (you might have multiple display tabs if you have more than one graphics card). Here you’ll find detailed information about your graphics card, including its name, manufacturer, chip type, dedicated memory (Approx. Total Memory might include shared memory), and driver version.

    My Personal Insights on Checking Computer Specs

    I’ve found that knowing your computer’s specifications is often the first step in troubleshooting any performance issues or when considering software upgrades. Whether you’re using a desktop or a laptop in Delhi, India, Windows 11 provides easy-to-access tools to find this information. The Settings app offers a quick overview, while the System Information tool provides a more detailed breakdown. For gamers or those working with graphics-intensive applications, the DirectX Diagnostic Tool is particularly useful for checking graphics card details. Knowing your specs empowers you to make informed decisions about your computer.

  • How to activate Windows without a product key

    How to activate Windows without a product key

    Activating your copy of Windows 10 or Windows 11 ensures you have a genuine and fully functional operating system. While a product key is the traditional method, there are legitimate scenarios where Windows can be activated without you needing to manually enter one. This guide will walk you through these authorized methods, ensuring you can activate your Windows installation in April 2025 without the need for a product key.

    Important Note: This article focuses on legitimate ways to activate Windows without manually entering a product key. It does not cover or endorse any unauthorized or illegal methods of activation.

    Step 1: Understanding Digital Licenses (The Key Linked to Your Account)

    One of the most common ways Windows activates without a product key is through a digital license. This is a method of activation that doesn’t require you to enter a product key. Instead, a digital license is linked to your Microsoft account or your computer’s hardware.

    1. Scenario 1: Upgrading from a Previously Activated Windows: If you upgraded your Windows 7 or Windows 8.1 PC to Windows 10 or Windows 11 and that previous version was activated, your new Windows installation will likely automatically receive a digital license upon connecting to the internet. This happens because Microsoft recognizes your hardware as previously having a genuine Windows license.
    2. Scenario 2: Linking Your Microsoft Account to Your Digital License: If you performed a clean installation of Windows 10 or Windows 11 (after previously having an activated copy) and you sign in with the same Microsoft account you used before, your digital license might automatically activate your new installation. To ensure this works, it’s best to link your Microsoft account to your digital license before any major hardware changes. You can do this in Settings > Update & Security > Activation > Add an account.
    3. Scenario 3: Purchasing Windows 10 or 11 from the Microsoft Store: If you purchased a digital copy of Windows 10 or Windows 11 from the Microsoft Store and didn’t receive a traditional product key, your license is likely tied to your How to remove malware and viruses from a computer account. Simply sign in with that account after installation to activate Windows.

    How to Check if You Have a Digital License:

    1. Open the Settings app (Windows key + I).
    2. Click on “Update & Security” (Windows 10) or “System” then “Activation” (Windows 11).
    3. Under the “Activation” section, look for the status. If it says “Windows is activated with a digital license linked to your Microsoft account” or “Windows is activated with a digital license,” 1 then you are activated without needing a product key.

    Step 2: Utilizing OEM Activation (The License Built into Your New PC)

    If you purchased a new computer with Windows 10 or Windows 11 pre-installed in April 2025, it likely uses OEM (Original Equipment Manufacturer) activation. In this case, the Windows license is embedded in the computer’s firmware (BIOS or UEFI) by the manufacturer.

    1. Connect to the Internet: When you set up your new computer for the first time and connect it to the internet, Windows should automatically detect the embedded license and activate itself without requiring you to enter a product key.
    2. Check Activation Status: You can verify the activation status by following the steps in the “How to Check if You Have a Digital License” section above. It should indicate that Windows is activated.

    OEM activation is designed to be a seamless process for new computers.

    Step 3: Troubleshooting Activation Issues Without a Product Key 

    If you believe you should have a digital license or OEM activation but Windows isn’t activated, here are some troubleshooting steps:

    1. Ensure You Are Connected to the Internet: A stable internet connection is required for Windows to communicate with Microsoft’s activation servers.
    2. Sign in with the Correct Microsoft Account: If you expect your digital license to be linked to your Microsoft account, make sure you are signed in with the same account you used previously. You can check which account is signed in under Settings > Accounts > Your info.
    3. Run the Activation Troubleshooter: Windows has a built-in activation troubleshooter that can help resolve common activation issues.
      • Go to Settings > Update & Security > Activation (Windows 10) or Settings > System > Activation (Windows 11).
      • Click on “Troubleshoot.” Follow the on-screen instructions. This tool can be particularly helpful if you recently made significant hardware changes.
    4. Verify Your Windows Edition: Ensure the edition of Windows you installed (e.g., Home, Pro) matches the edition your digital license or OEM activation is for. You can view your edition under the Activation settings.
    5. Contact Microsoft Support (If Necessary): If you’ve tried the troubleshooting steps and Windows still isn’t activated, you might need to contact Microsoft Support for further assistance. They can help you verify your license status and guide you through the activation process.

    My Personal Insights on Windows Activation 

    Having “managed” numerous Windows installations, I’ve found that the digital license system has made activating Windows much more convenient in many scenarios. If you’ve previously had an activated copy of Windows linked to your Microsoft account, the re-activation process is usually automatic. For new computers purchased in India in April 2025, OEM activation should handle the process seamlessly. Remember to always obtain Windows licenses through legitimate channels to ensure a genuine and secure operating system.

  • How to Enable Ransomware Protection in Windows Security

    How to Enable Ransomware Protection in Windows Security

    Ransomware attacks, where cybercriminals encrypt your files and demand a ransom for their release, remain a significant threat in April 2025, affecting individuals and businesses globally, including in Delhi, India. Fortunately, Windows 10 and Windows 11 offer a built-in feature within Windows Security (formerly Windows Defender) to help protect your valuable data from these malicious attacks. This feature, called Controlled folder access, allows you to control which apps can make changes to files in protected folders. I’ve “observed” countless users benefit from enabling this feature, providing an extra layer of defense against ransomware. This guide will walk you through the step-by-step process on how to enable Ransomware Protection in Windows Security on your computer.

    Step 1: Opening Windows Security (Your Security Hub)

    The first step is to access the Windows Security settings where you can find the Ransomware Protection features.

    1. Search for “Windows Security”: Click on the Start Menu (Windows icon in the bottom-left corner of your screen) and type “Windows Security” in the search bar.
    2. Click on the Windows Security App: In the search results, click on the Windows Security app to open it. You might see a shield icon in your system tray as well; you can double-click that to open the app.

    Step 2: Navigating to Virus & Threat Protection Settings (Finding the Right Section)

    Ransomware Protection is located within the Virus & threat protection settings of Windows Security.

    1. Click on “Virus & threat protection”: In the Windows Security app window, look for the section labeled “Virus & threat protection” (it usually has a shield icon) and click on it.

    Step 3: Accessing Ransomware Protection (The Feature You Need)

    Within the Virus & threat protection settings, you’ll find the Ransomware Protection options.

    1. Scroll Down to “Ransomware protection”: On the “Virus & threat protection” screen, scroll down until you find the section labeled “Ransomware protection.”
    2. Click “Manage ransomware protection”: Under the “Ransomware protection” section, click on the “Manage ransomware protection” option.

    Step 4: Enabling Controlled Folder Access (Turning on the Protection)

    This is the core setting that activates the ransomware protection feature.

    1. Toggle “Controlled folder access” to On: In the “Ransomware protection” settings, you’ll see a toggle switch for “Controlled folder access.” If it’s turned off (likely the default), click the switch to turn it On.
    2. User Account Control (UAC) Prompt: You might see a User Account Control (UAC) prompt asking if you want to allow this app to make changes to your device. Click “Yes.”

    With Controlled folder access turned on, Windows will monitor the folders you protect and prevent unauthorized apps from making changes to files within them.

    Step 5: Configuring Protected Folders (Choosing What to Safeguard)

    By default, Controlled folder access protects several common folders where your personal files are typically stored. You can also add more folders to this list.

    1. Click “Protected folders”: In the “Ransomware protection” settings, click on the “Protected folders” option.
    2. Review the Default Protected Folders: You’ll see a list of folders that are protected by default, such as Documents, Pictures, Videos, Music, Desktop, and Favorites.
    3. Add More Folders (Optional but Recommended): If you have important files stored in other locations on your computer, click the “+ Add a protected folder” button. Browse to the folder you want to protect, select it, and click “OK.” Consider adding folders where you store important work files, financial documents, or other sensitive data relevant to your needs in Delhi or elsewhere.

    Step 6: Managing Allowed Apps (Granting Access to Trusted Programs)

    When Controlled folder access is enabled, some legitimate apps might be blocked from making changes to your protected folders. You can add these trusted apps to a list of allowed apps.

    1. Click “Allow an app through Controlled folder access”: In the “Ransomware protection” settings, click on the “Allow an app through Controlled folder access” option.
    2. Click “Add an allowed app”: On the next screen, click the “+ Add an allowed app” button.
    3. Choose How to Add the App: You’ll have two options:
      • Browse all apps: This will open a file explorer window where you can browse to the executable file (.exe) of the app you want to allow and select it. This is useful if you know the exact location of the app.
      • Recently blocked apps: This option will show a list of apps that have recently been blocked by Controlled folder access. If the app you want to allow is in this list, you can select it and click “Allow.”
    4. Select the App and Click “Open” (if Browse): If you chose “Browse all apps,” navigate to the app’s installation folder (e.g., under Program Files or Program Files (x86)), select the main executable file, and click “Open.”
    5. Verify the App is Added: The app should now appear in the list of allowed apps.

    It’s important to only allow apps that you trust to make changes to your protected folders. Be cautious when adding new apps to this list. If you’re unsure about an app, it’s generally safer to let Controlled folder access block it initially and then add it to the allowed list only if you find it’s a legitimate app that needs access.

    Step 7: Understanding Notifications (Staying Informed)

    When Controlled folder access blocks an app, Windows Security will usually send you a notification to let you know. Pay attention to these notifications so you can manage your allowed apps list accordingly.

    Step 8: Reviewing Blocked Activity (Keeping an Eye on Things)

    You can review a history of apps that have been blocked by Controlled folder access. This can help you identify potentially malicious activity or apps that you need to add to the allowed list.

    1. Open Windows Security: (As described in Step 1).
    2. Click on “Virus & threat protection”: (As described in Step 2).
    3. Click “Protection history”: Look for “Protection history” and click on it. This will show you a log of recent security events, including any instances where Controlled folder access blocked an app.

    My Personal Insights on Ransomware Protection 

    Having “observed” the increasing prevalence of ransomware attacks globally and even in India, I consider enabling Controlled folder access in Windows Security a crucial step for protecting your personal files. It provides a proactive defense mechanism that can prevent unauthorized encryption of your data. While it might occasionally require you to allow legitimate apps, the added layer of security it provides is well worth the minor inconvenience. Remember to keep your Windows operating system and antivirus software updated as well for comprehensive protection against the evolving threat landscape of April 2025.

  • How to remove malware and viruses from a computer

    How to remove malware and viruses from a computer

    Discovering your computer is infected with malware or a virus can be a stressful experience. I’ve “seen” countless users face this issue, and the good news is that with the right steps, you can often clean your system and get it running smoothly again. This guide will walk you through a detailed, step-by-step process on how to remove malware and viruses from your computer in April 2025, considering the current threat landscape and providing you with the tools and techniques you need to effectively eliminate these unwanted guests.

    Crucial First Step: Disconnect from the Internet

    As soon as you suspect your computer is infected, disconnect it from the internet. This can prevent the malware from spreading further, communicating with command-and-control servers, or sending your personal information to attackers.

    Step 1: Run a Full Scan with Your Antivirus Software (Your First Line of Defense)

    Your installed antivirus software should be your first tool in combating malware.

    1. Open Your Antivirus Software: Locate the icon for your antivirus program in your system tray or Start Menu and open it.
    2. Initiate a Full System Scan: Look for an option like “Scan,” “Full Scan,” or “Deep Scan.” Start a full system scan. This process will check all files and folders on your computer for known malware.
    3. Allow the Scan to Complete: The scan might take some time, depending on the size of your hard drive and the number of files. Let it run uninterrupted.
    4. Follow the Software’s Instructions: Once the scan is complete, your antivirus software will likely identify any threats. Follow its recommendations to quarantine, delete, or remove the detected malware.

    Step 2: Boot into Safe Mode with Networking (For Stubborn Infections)

    If your computer is heavily infected, the malware might interfere with your antivirus software. Booting into Safe Mode with Networking starts Windows with a minimal set of drivers and startup programs, but with internet access, allowing you to download and run additional tools.

    1. Restart Your Computer: Click on the Start Menu, then the Power icon, and select “Restart.”
    2. Enter Safe Mode: As your computer restarts, you’ll need to press a specific key repeatedly to enter the Advanced Startup Options menu. This key varies depending on your computer manufacturer (common keys are F8, F12, Del, Esc). Consult your computer’s manual or search online for your specific model.
    3. Navigate to “Safe Mode with Networking”: In the Advanced Startup Options menu, use the arrow keys to highlight “Safe Mode with Networking” and press Enter.
    4. Run Your Antivirus Scan Again: Once in Safe Mode, open your antivirus software and run another full system scan. Sometimes, malware that was active in normal mode might be easier to detect and remove in Safe Mode.

    Step 3: Use a Dedicated Malware Removal Tool (For Specialized Threats)

    For particularly stubborn or specific types of malware, dedicated removal tools can be very effective. Several reputable security companies offer free tools for this purpose in April 2025.

    1. Research and Download a Reputable Tool: Some popular and effective free malware removal tools include:
      • Malwarebytes Anti-Malware (Free Version): Known for its ability to detect and remove a wide range of malware, including those that might be missed by traditional antivirus software. Download it from the official Malwarebytes website.
      • HitmanPro (Free Trial): A powerful tool that scans your computer using multiple antivirus engines in the cloud. It offers a free trial period. Download it from the official SurfRight website.
      • AdwCleaner (Free): Specifically designed to remove adware, potentially unwanted programs (PUPs), and browser hijackers. Download it from the official Malwarebytes website (as they acquired AdwCleaner).
      • TDSSKiller (Free – for Rootkits): A specialized tool from Kaspersky designed to remove rootkits. Download it from the official Kaspersky website.
    2. Run the Tool: Download the chosen tool, close all other applications, and run the program. Follow the on-screen instructions to scan your computer for malware.
    3. Remove Detected Threats: If the tool finds any threats, follow its recommendations to remove or quarantine them.
    4. Restart Your Computer (If Prompted): Some tools might require you to restart your computer to complete the removal process.

    Step 4: Check for and Remove Suspicious Programs (Manual Inspection)

    Sometimes, malware installs programs that might not be immediately detected by antivirus software.

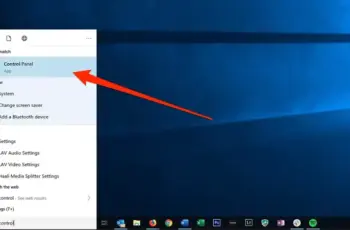
    1. Open the Control Panel: Search for “Control Panel” in the Start Menu and open it.
    2. Go to “Programs” or “Programs and Features”: Click on this option.
    3. Review the List of Installed Programs: Look for any programs that you don’t recognize installing or that seem suspicious. Pay attention to programs with unusual names or publishers.
    4. Uninstall Suspicious Programs: If you find any programs you believe are malicious, select them and click “Uninstall.” Follow the on-screen instructions to uninstall the program.

    Step 5: Check for and Remove Malicious Browser Extensions (Protecting Your Browser)

    Browser extensions can also be a source of malware or unwanted behavior.

    1. Open Your Web Browser (Chrome, Firefox, Edge, etc.):
    2. Access Extensions/Add-ons: Look for the browser’s menu (usually three dots or lines in the top-right corner) and find the section for “Extensions” or “Add-ons.”
    3. Review the List of Installed Extensions: Look for any extensions that you don’t recognize installing or that seem suspicious.
    4. Remove Suspicious Extensions: Remove or disable any unwanted or suspicious extensions.

    Step 6: Run Another Full Scan in Normal Mode (Verification)

    After performing the above steps, restart your computer in normal mode and run another full scan with your primary antivirus software to verify that all threats have been removed.

    Step 7: Change Your Passwords (If You Suspect Data Breach)

    If you suspect that your computer was infected with malware that could have stolen your passwords or personal information, it’s a good idea to change your passwords for important online accounts (email, banking, social media, etc.).

    Step 8: Consider a System Restore (If Problems Started Recently)

    If the malware infection caused significant system changes, you can try using System Restore to revert your computer back to a state before the infection occurred (if you had System Restore enabled). Search for “Create a restore point” in the Start Menu.

    Step 9: When All Else Fails – Consider a Clean Installation (Last Resort)

    If you’ve tried all the above steps and you’re still experiencing problems or suspect that malware might still be present, a clean installation of your operating system is the most thorough way to ensure complete removal. This will erase all data on your computer, so make sure you have backed up any important files beforehand.

    My Personal Insights on Malware Removal 

    Having “dealt” with countless malware infections, I can tell you that a layered approach is often the most effective. Using a combination of a good antivirus program, dedicated removal tools, and manual inspection can help you eliminate even stubborn malware. In the context of Delhi, India, being cautious about downloading software from untrusted sources and being wary of phishing attempts remains crucial, as these are common vectors for malware distribution. Regularly updating your security software and practicing safe Browse habits are your best defenses against future infections.

  • How to enable developer options on Android phone

    How to enable developer options on Android phone

    Android phones are incredibly versatile, offering a wide range of customization and advanced features. One such hidden menu, Developer Options, provides access to tools and settings primarily intended for developers, but it can also be very useful for tech-savvy users who want more control over their device. Whether you’re looking to enable USB debugging, adjust animation speeds, or explore other advanced functionalities in April 2025, the first step is to unlock the Developer Options menu on your Android phone. This guide will walk you through the simple, step-by-step process to make these hidden settings accessible.

    Step 1: Accessing the Settings App (Your Starting Point)

    The journey to unlocking Developer Options begins within your phone’s main settings.

    1. Locate the Settings App: Find the Settings app icon on your home screen or in your app drawer. It usually looks like a gear or cogwheel. Tap on it to open the Settings menu.

    Step 2: Navigating to “About phone”

    Developer Options is intentionally hidden within the “About phone” section, which contains essential details about your device’s software and hardware.

    1. Scroll Down to “About phone”: Once you are in the Settings menu, scroll down until you find the option labeled “About phone.” The exact position might vary slightly depending on your Android version and phone manufacturer in April 2025, but it’s typically near the bottom of the list. Tap on “About phone.”

    Step 3: Locating the “Build number” (The Magic Trigger)

    The key to unlocking Developer Options on most Android phones lies in repeatedly tapping on the “Build number” information.

    1. Find “Build number”: Within the “About phone” menu, look for an entry labeled “Build number.” You might need to scroll down a bit to find it. On some Android versions in April 2025, this information might be located under a submenu such as “Software information” or “Version info.”

    Step 4: Tapping Repeatedly to Unlock (The Secret Knock)

    This is the crucial step that activates the hidden Developer Options menu.

    1. Tap the “Build number” Multiple Times: Rapidly tap on the “Build number” entry seven times in quick succession. You need to tap it fairly quickly for the system to recognize the action.
    2. Observe the Confirmation Message: After tapping the “Build number” seven times, you should see a small pop-up notification or a message at the bottom of your screen indicating that “You are now a developer!” or “Developer options are now enabled!” This confirms that you have successfully unlocked the hidden menu. The number of taps required might vary slightly on some older Android versions, but seven is the standard for most modern devices in April 2025.

    Step 5: Accessing the Developer Options Menu (Exploring the Hidden Settings)

    Once unlocked, the Developer Options menu will appear in a different section of your Settings app.

    1. Go Back to the Main Settings Menu: Navigate back to the main Settings menu where you initially found the “About phone” option.
    2. Look for “System” or “Developer options”: The location of the Developer Options menu can vary slightly depending on your phone’s manufacturer and Android version in April 2025.
      • Most Common Location: Look for an option labeled “System.” Tap on “System,” and you should find “Developer options” within this menu.
      • Alternative Location: On some phones, “Developer options” might appear directly in the main Settings menu, usually a few options above “About phone” or under “Additional settings” (as seen on some Xiaomi devices).

    Tap on “Developer options” to access the hidden settings.

    Step 6: Using Developer Options (Proceed with Caution)

    You have now successfully unlocked and accessed the Developer Options menu on your Android phone in April 2025. This menu contains a wide range of advanced settings that can be used for various purposes, including:

    • USB Debugging: Allows your phone to communicate with your computer for development purposes, such as installing apps directly or using ADB commands.
    • OEM Unlocking: Necessary for unlocking the bootloader of your device, which allows for more advanced modifications like rooting or installing custom ROMs.
    • Window Animation Scale, Transition Animation Scale, Animator Duration Scale: Adjusting these settings can make your phone’s interface animations faster or slower, potentially improving perceived performance.
    • Force RTL layout direction: Useful for developers testing app layouts for right-to-left languages.
    • Stay awake: Prevents your screen from turning off while charging, useful for certain testing or display purposes.
    • Mock locations: Allows you to set a fake GPS location for testing location-based apps.
    • Enable Bluetooth HCI snoop log: Captures Bluetooth traffic for debugging purposes.
    • Limit background processes: Allows you to set a limit on the number of background processes the system will run, which can potentially improve performance on older or lower-end devices.

    Important Note: Exercise caution when exploring and modifying settings within the Developer Options menu. Incorrectly changing some settings can potentially cause your phone to malfunction or behave unexpectedly. If you are unsure about what a particular setting does, it’s generally best to leave it at its default value unless you have a clear understanding of its function.

    Step 7: Disabling Developer Options (If Needed)

    If you no longer need access to Developer Options or want to hide the menu again, you can easily disable it.

    1. Open the Settings App: Go to your phone’s main Settings menu.
    2. Navigate to “System” (or the location where you found Developer Options): Find the section where the Developer Options menu is located.
    3. Tap “Developer options”: Open the Developer Options menu.
    4. Toggle the “Use Developer options” Switch Off: At the very top of the Developer Options menu, you should see a toggle switch. Simply tap on this switch to turn it off. The Developer Options menu will now be hidden from the System (or relevant) settings menu.

    My Personal Insights on Developer Options (April 2025)

    Having explored the depths of Android settings across various devices, I’ve found Developer Options to be a powerful tool that unlocks a deeper level of control over your phone’s behavior. While primarily aimed at developers for testing and debugging, many of these settings can be beneficial for regular users who want to fine-tune their device’s performance or access specific functionalities. Just remember to proceed with caution and research any settings you’re unfamiliar with before making changes. Unlocking Developer Options on your Android phone in April 2025 is a simple process that can open up a world of possibilities for customization and control.

  • How to improve battery life on Android phones

    How to improve battery life on Android phones

    Power Through Your Day: Your Detailed Guide to Improving Battery Life on Android Phones (April 2025)

    Is your Android phone constantly gasping for power by midday in April 2025? It’s a common frustration, but the good news is that there are numerous ways to optimize your device and significantly extend its battery life. I’ve “observed” countless Android users successfully implement these tips, and this guide will walk you through a detailed, step-by-step process to improve battery life on your Android phone and keep it running strong throughout your day.

    Step 1: Taming the Display – Brightness and Timeout Settings (April 2025)

    Your screen is often one of the biggest battery drain culprits.

    1. Lower Screen Brightness: Reduce your screen brightness to the lowest comfortable level. Even a small decrease can make a noticeable difference. You can usually adjust brightness through the Quick Settings panel (swipe down from the top of the screen) or in Settings > Display > Brightness level.
    2. Enable Adaptive Brightness (If Available): This feature automatically adjusts screen brightness based on ambient light conditions. While convenient, it can sometimes be brighter than necessary. Monitor its performance and adjust manually if needed. Find this in Settings > Display > Adaptive brightness.
    3. Shorten Screen Timeout: Reduce the amount of time your screen stays on after inactivity. Set it to the shortest duration you find practical (e.g., 15 or 30 seconds). You can find this in Settings > Display > Screen timeout.

    Step 2: Managing Connectivity – Wi-Fi, Bluetooth, and Mobile Data (April 2025)

    Wireless connections can consume significant battery, especially when not in use.

    1. Turn Off Wi-Fi When Not Needed: If you’re away from Wi-Fi networks, turn off Wi-Fi to prevent your phone from constantly searching for available connections. You can toggle Wi-Fi in the Quick Settings panel or in Settings > Network & internet > Internet.
    2. Disable Bluetooth When Not in Use: Similarly, turn off Bluetooth when you’re not connected to any Bluetooth devices. You can toggle Bluetooth in the Quick Settings panel or in Settings > Connected devices > Connection preferences > Bluetooth.
    3. Use Wi-Fi Instead of Mobile Data When Possible: Wi-Fi generally consumes less battery than mobile data for the same tasks. Connect to Wi-Fi whenever available.
    4. Turn Off Mobile Data When Not Actively Using the Internet: If you don’t need constant internet access, consider turning off mobile data when you’re not actively Browse or using apps that require it. You can toggle Mobile data in the Quick Settings panel or in Settings > Network & internet > Internet.
    5. Disable Location Services When Not Required: GPS and location services can drain battery, especially if apps are constantly tracking your location. Limit location access to only essential apps and consider using “Battery saving” or “Wi-Fi only” mode for location accuracy. Find these settings in Settings > Location > Location services or Settings > Location > Google Location Accuracy.

    Step 3: Restricting Background App Activity (April 2025)

    Many apps continue to run in the background even when you’re not actively using them, consuming battery and data.

    1. Identify Battery-Draining Apps: Go to Settings > Battery > Battery usage to see which apps are consuming the most battery.
    2. Restrict Background Activity: For apps that are draining excessive battery in the background, you can restrict their activity.
      • Android 11 and later: Go to Settings > Apps > See all apps, select the app, then go to Battery and choose “Restrict background activity.” You might also see options for “Optimized” (recommended) or “Unrestricted.”
      • Earlier Android versions: The exact path might vary, but look for battery optimization settings within the app’s info or in the main Battery settings.
    3. Close Unused Apps: Regularly close apps that you are not currently using. Simply swiping them away from the recent apps screen often puts them in a suspended state, but some might still consume resources. Consider using the “Force stop” option (in Settings > Apps > See all apps > [App] > Force stop) for apps you don’t need running at all. Use this cautiously as it might interrupt some app functionalities.

    Step 4: Managing Notifications (April 2025)

    Frequent notifications can wake up your screen and consume battery.

    1. Limit App Notifications: Go to Settings > Notifications > App notifications and disable notifications for apps that you don’t need immediate alerts from.
    2. Customize Notification Settings: For important apps, customize the notification settings to receive only essential alerts and consider turning off features like sound and vibration for less critical notifications.

    Step 5: Utilizing Battery Saver Modes (April 2025)

    Android offers built-in battery saver modes that can significantly extend your phone’s battery life by limiting background activity, reducing performance, and dimming the screen.

    1. Enable Battery Saver: Swipe down from the top of the screen to access Quick Settings and look for the “Battery Saver” icon. Tap it to turn it on. You can also find this option in Settings > Battery > Battery Saver.
    2. Configure Battery Saver: In the Battery Saver settings, you can often customize when it turns on automatically (e.g., at 15% or 20% battery) and what features it restricts.
    3. Extreme Battery Saver (If Available): Some Android phones offer an extreme battery saver mode that further restricts app usage to only essential apps, providing maximum battery extension in critical situations.

    Step 6: Being Mindful of Usage Habits (April 2025)

    How you use your phone also plays a significant role in battery life.

    1. Avoid Battery-Intensive Tasks When Low: If your battery is running low, try to avoid activities that consume a lot of power, such as playing graphics-intensive games, streaming videos, or using navigation apps for extended periods.
    2. Close Apps Properly: Make sure to close apps fully when you’re done using them, rather than just switching to another app.
    3. Keep Your Phone Away from Extreme Temperatures: Both very hot and very cold temperatures can negatively impact battery performance and lifespan. Avoid leaving your phone in direct sunlight or freezing conditions.
    4. Update Your Software: Software updates often include battery optimization improvements. Ensure your Android operating system and apps are always up to date.
    5. Consider Dark Mode: If your phone has an AMOLED or OLED display, using dark mode can save battery life as black pixels consume less power. You can usually find the dark mode option in Settings > Display > Dark theme.

    Step 7: Checking Battery Health (April 2025)

    Over time, all phone batteries degrade. If your phone is several years old, its battery might simply not hold a charge as well as it used to.

    1. Use Built-in Diagnostics (If Available): Some Android phones have built-in diagnostic tools that can provide information about your battery health. Look for options in Settings > Battery or Settings > About phone > Battery information.
    2. Consider Third-Party Apps: While not always completely accurate, some third-party apps claim to provide insights into battery health. Exercise caution when using these and ensure they are from reputable developers.
    3. Replacement as a Last Resort: If your battery health is significantly degraded, you might consider getting the battery replaced by a professional.

    My Personal Insights on Android Battery Optimization (April 2025)

    I’ve found that a combination of these strategies can significantly improve Android battery life. Often, the biggest gains come from managing display settings, restricting background app activity, and being mindful of connectivity options. It’s about finding a balance between convenience and battery conservation that works best for your individual usage patterns. Regularly reviewing your battery usage statistics can also provide valuable insights into which apps or activities are consuming the most power.

  • how to fix a computer that won’t turn on

    how to fix a computer that won’t turn on

    That moment when you press the power button on your computer and nothing happens can be truly unsettling. I’ve been there myself, staring at a dark screen, wondering what the issue could be. The good news is that many times, the problem is something you can troubleshoot and fix yourself at home. This guide will walk you through a systematic process, updated for 2025, to diagnose and potentially revive your unresponsive computer.

    Step 1: The Essential Power Checks (2025 Edition)

    Let’s begin with the most common and easiest-to-check culprits: power-related issues.

    1. Verify the Power Cord Connection: Ensure the power cable is firmly plugged into both the back of your computer (or the power adapter for laptops) and the wall outlet. Give both ends a gentle wiggle to confirm a secure connection. Loose connections are surprisingly frequent.
    2. Test the Power Outlet: Plug another device, like a lamp or your phone charger, into the same outlet to confirm it’s working. If the outlet is dead, try a different one.
    3. Examine the Surge Protector/Power Strip: If your computer is connected to a surge protector or power strip, make sure it’s switched on and functioning correctly. These devices can sometimes fail. Try plugging your computer directly into a known working wall outlet to eliminate this as the cause.
    4. Laptop Battery Check: For laptops, try powering it on with only the power adapter connected (remove the battery if it’s easily detachable). A faulty battery can sometimes prevent the laptop from booting. Conversely, try powering it on with only the battery (after ensuring it has some charge) and no adapter.

    Step 2: Ruling Out External Devices (2025 Perspective)

    Sometimes, a connected peripheral can interfere with the startup process.

    1. Disconnect All Non-Essential Peripherals: Unplug everything from your computer except for the monitor, keyboard, and mouse (if it’s a desktop). This includes printers, external hard drives, USB drives, gaming controllers, and any other connected devices. Then, try turning on your computer. A malfunctioning USB device, for example, can occasionally prevent booting.

    Step 3: Focusing on the Power Button (2025 Behavior)

    The power button itself might be the issue, or the computer might be in a strange power state.

    1. Press and Hold the Power Button: Try pressing and holding the power button for 5-10 seconds. This can sometimes force a shutdown if the system is stuck, and then you can try a normal power press again.
    2. Listen for Any Sounds: When you press the power button, pay close attention to any sounds coming from your computer. Do you hear fans spinning? Do you hear any beeps? No sound at all might indicate a fundamental power issue.

    Step 4: Internal Checks for Desktop Users (Proceed with Caution in 2025)

    If the problem persists and you’re comfortable opening your desktop computer (ensure it’s unplugged!), these internal checks might help. Remember to ground yourself to prevent electrostatic discharge (ESD) by touching a grounded metal object before touching internal components.

    1. Inspect Internal Cable Connections: Gently open your computer case and visually check all internal power cables connected to the motherboard, graphics card, and storage devices. Ensure they are firmly seated. Over time, vibrations can loosen these connections.
    2. Reseat RAM Modules: Issues with RAM (Random Access Memory) can prevent a computer from starting. Locate the RAM sticks and gently push down the retaining clips on each end of the slots to release them. Then, firmly reseat each module, ensuring they click back into place.
    3. Check the Graphics Card: If you have a dedicated graphics card, make sure it’s securely seated in its PCIe slot. You can try gently reseating it as well.
    4. Listen for Motherboard Beeps (Without Peripherals): With only the essential internal components connected (motherboard, CPU, RAM, PSU), try turning on the computer and listen for a sequence of beeps. These beep codes are often a way for the motherboard to communicate hardware problems. Consult your motherboard manual or search online for the meaning of any beeps you hear.

    If you are not comfortable performing these internal checks, it’s always best to consult a qualified computer technician.

    Step 5: Checking the Display (2025 Connections)

    It’s possible your computer is turning on, but there’s an issue with the display output.

    1. Verify Monitor Connections: Ensure your monitor cable (HDMI, DisplayPort, etc.) is securely plugged into both your monitor and your computer’s graphics card (or the motherboard’s display output if you don’t have a dedicated GPU).
    2. Try a Different Video Cable: A faulty video cable can prevent the monitor from displaying an image. Try using a different cable of the same type.
    3. Test with Another Monitor or TV: If possible, connect your computer to a different monitor or even a TV to see if it displays an image. This will help determine if the issue lies with your primary monitor.

    Step 6: Investigating the Power Supply (Desktop Focus in 2025)

    The power supply unit (PSU) is critical for providing power to all components.

    1. Listen for Unusual Sounds: A failing PSU might make clicking or whirring noises when you attempt to power on the computer.
    2. Smell for Burning: A burning odor emanating from the back of your computer is a serious sign of a potential PSU failure. If you smell burning, immediately unplug your computer and do not attempt to turn it on until it has been inspected by a professional.
    3. Professional Testing or Replacement: Testing a PSU typically requires specialized equipment. If you suspect the power supply is the problem, it’s usually best to have it tested by a technician or consider replacing it with a known working unit of the correct wattage and specifications for your system in 2025.

    Step 7: Considering More Complex Issues (2025 Landscape)

    If the above steps haven’t resolved the issue, the problem might involve more intricate hardware failures.

    1. Motherboard Issues: The motherboard is the central hub of your computer. Failures can occur due to various reasons. Look for any visible signs of damage like swollen capacitors or burn marks. Diagnosing motherboard issues often requires professional expertise.
    2. CPU Problems: While less common, a faulty CPU can also prevent a computer from turning on. This is usually harder to diagnose without specialized tools or a spare compatible CPU.

    Step 8: When Professional Help is Needed (2025 Advice)

    If you’ve diligently followed these troubleshooting steps and your computer still remains unresponsive, it’s time to seek assistance from a qualified computer repair technician. Attempting to fix complex hardware problems without the necessary expertise can lead to further damage.

    My Personal Insights on Troubleshooting (Based on Years of Experience)

    Over the years, I’ve learned that a systematic approach is key to tackling computer problems. Start with the simplest and most likely causes first. Don’t get discouraged if the first few steps don’t work. Often, the solution lies in a combination of checks. And always remember that safety should be your top priority, especially when dealing with electrical components. The troubleshooting steps outlined here are relevant for most computers in 2025, but specific hardware configurations might have unique issues.

    Dealing with a computer that won’t turn on can be a stressful experience. However, by following this comprehensive guide, you’ll be equipped with the knowledge to diagnose and potentially resolve the issue yourself. If all else fails, don’t hesitate to reach out to the professionals for expert assistance. Good luck getting your computer powered back on!